Technical Information · issue 22 of 2010
New STIHL Battery Belt
IssueTI 22/2010
Full text
Page 1 of 6
Text of page 1 — search, copy, screen readers
STIH)

Technical Information                    22.2010

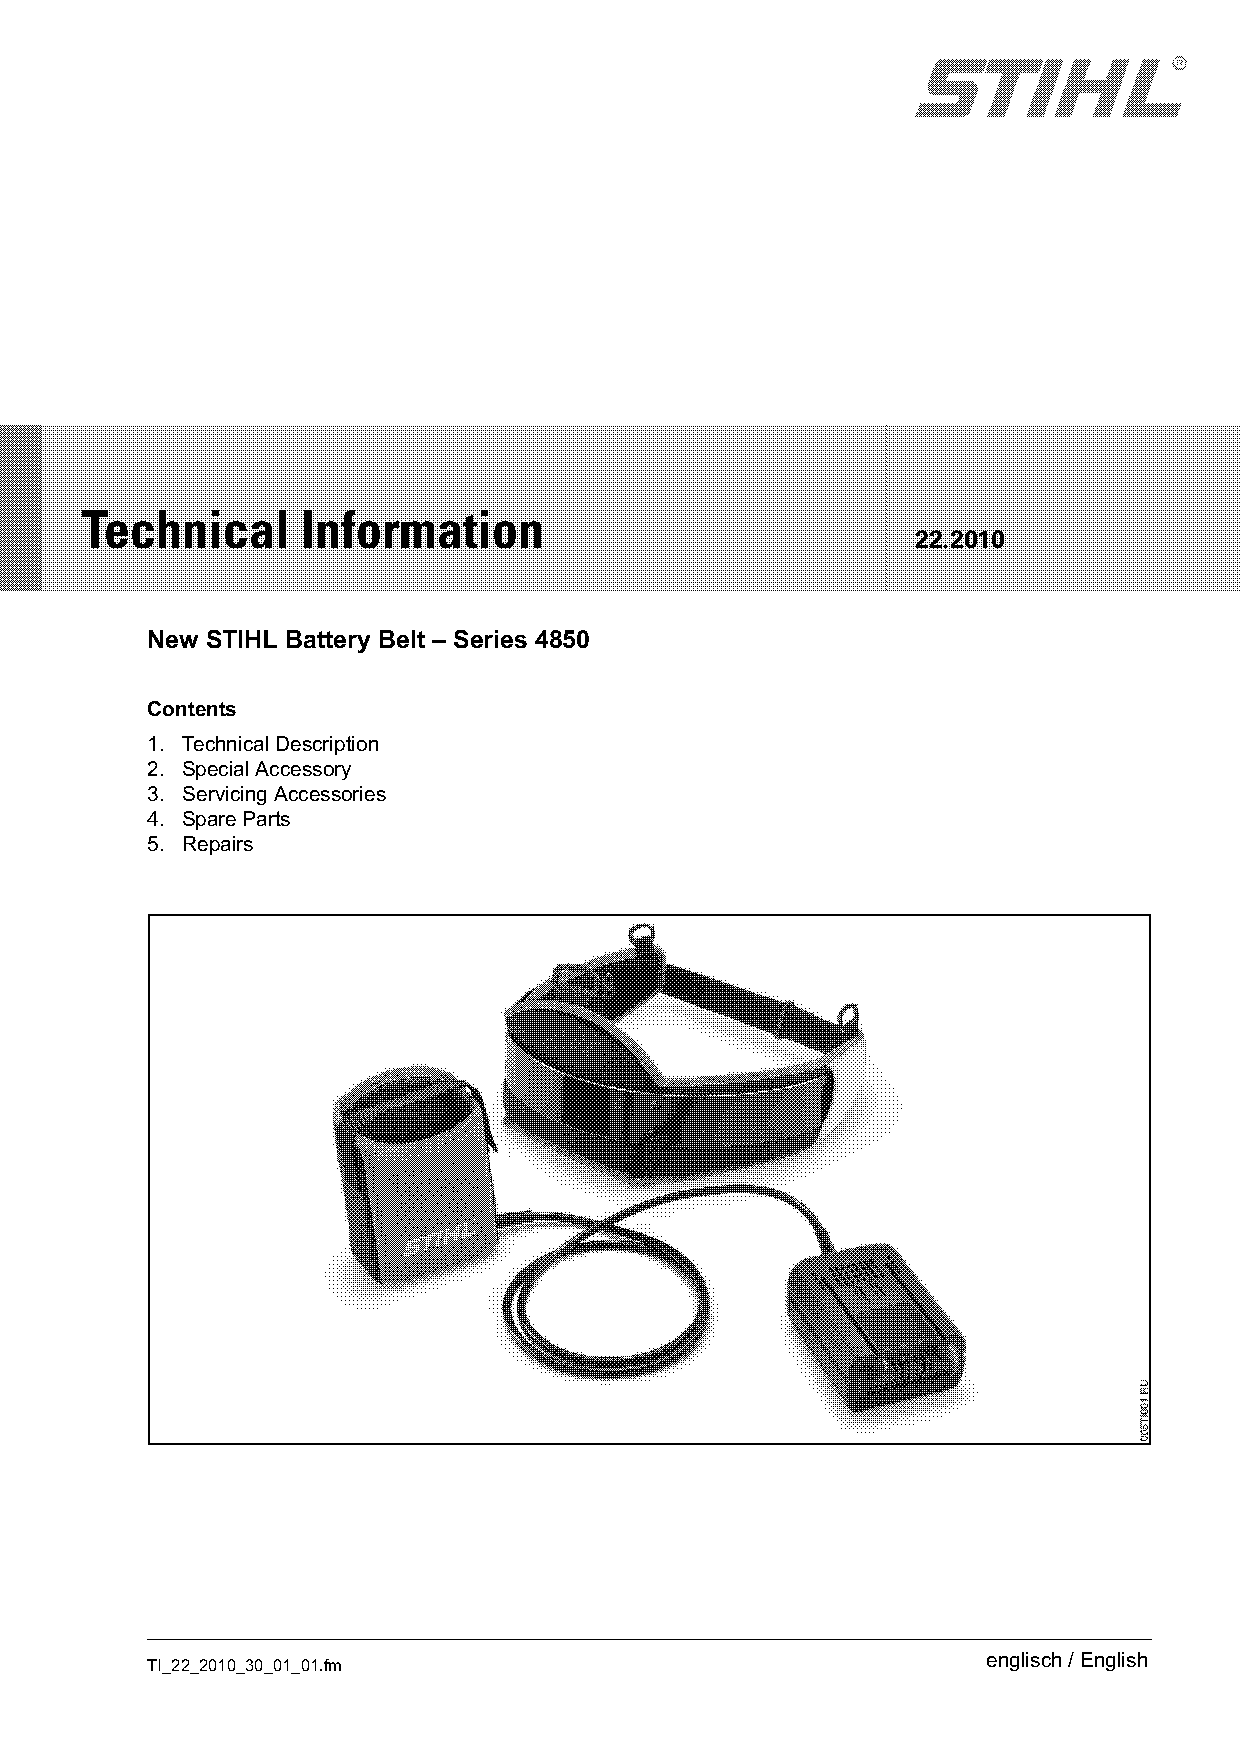
  New STIHL Battery Belt – Series 4850

  Contents
  1.   Technical Description
  2.   Special Accessory
  3.   Servicing Accessories
  4.   Spare Parts
  5.   Repairs

  TI_22_2010_30_01_01.fm                      englisch / English
Page 2 of 6
Text of page 2 — search, copy, screen readers
Page 2                                                                                Technical Information 22.2010

Using the battery belt helps reduce the weight of
STIHL cordless power tools by the weight of the
battery (e.g. by 3.8 lbs/1.7 kg with AP 160). This
improves handling and ensures less tiring
operation.
The battery belt can be used with all STIHL cordless
power tools and is available as a special accessory.

1.       Technical Description

                                                                                                                       005TI003 KN
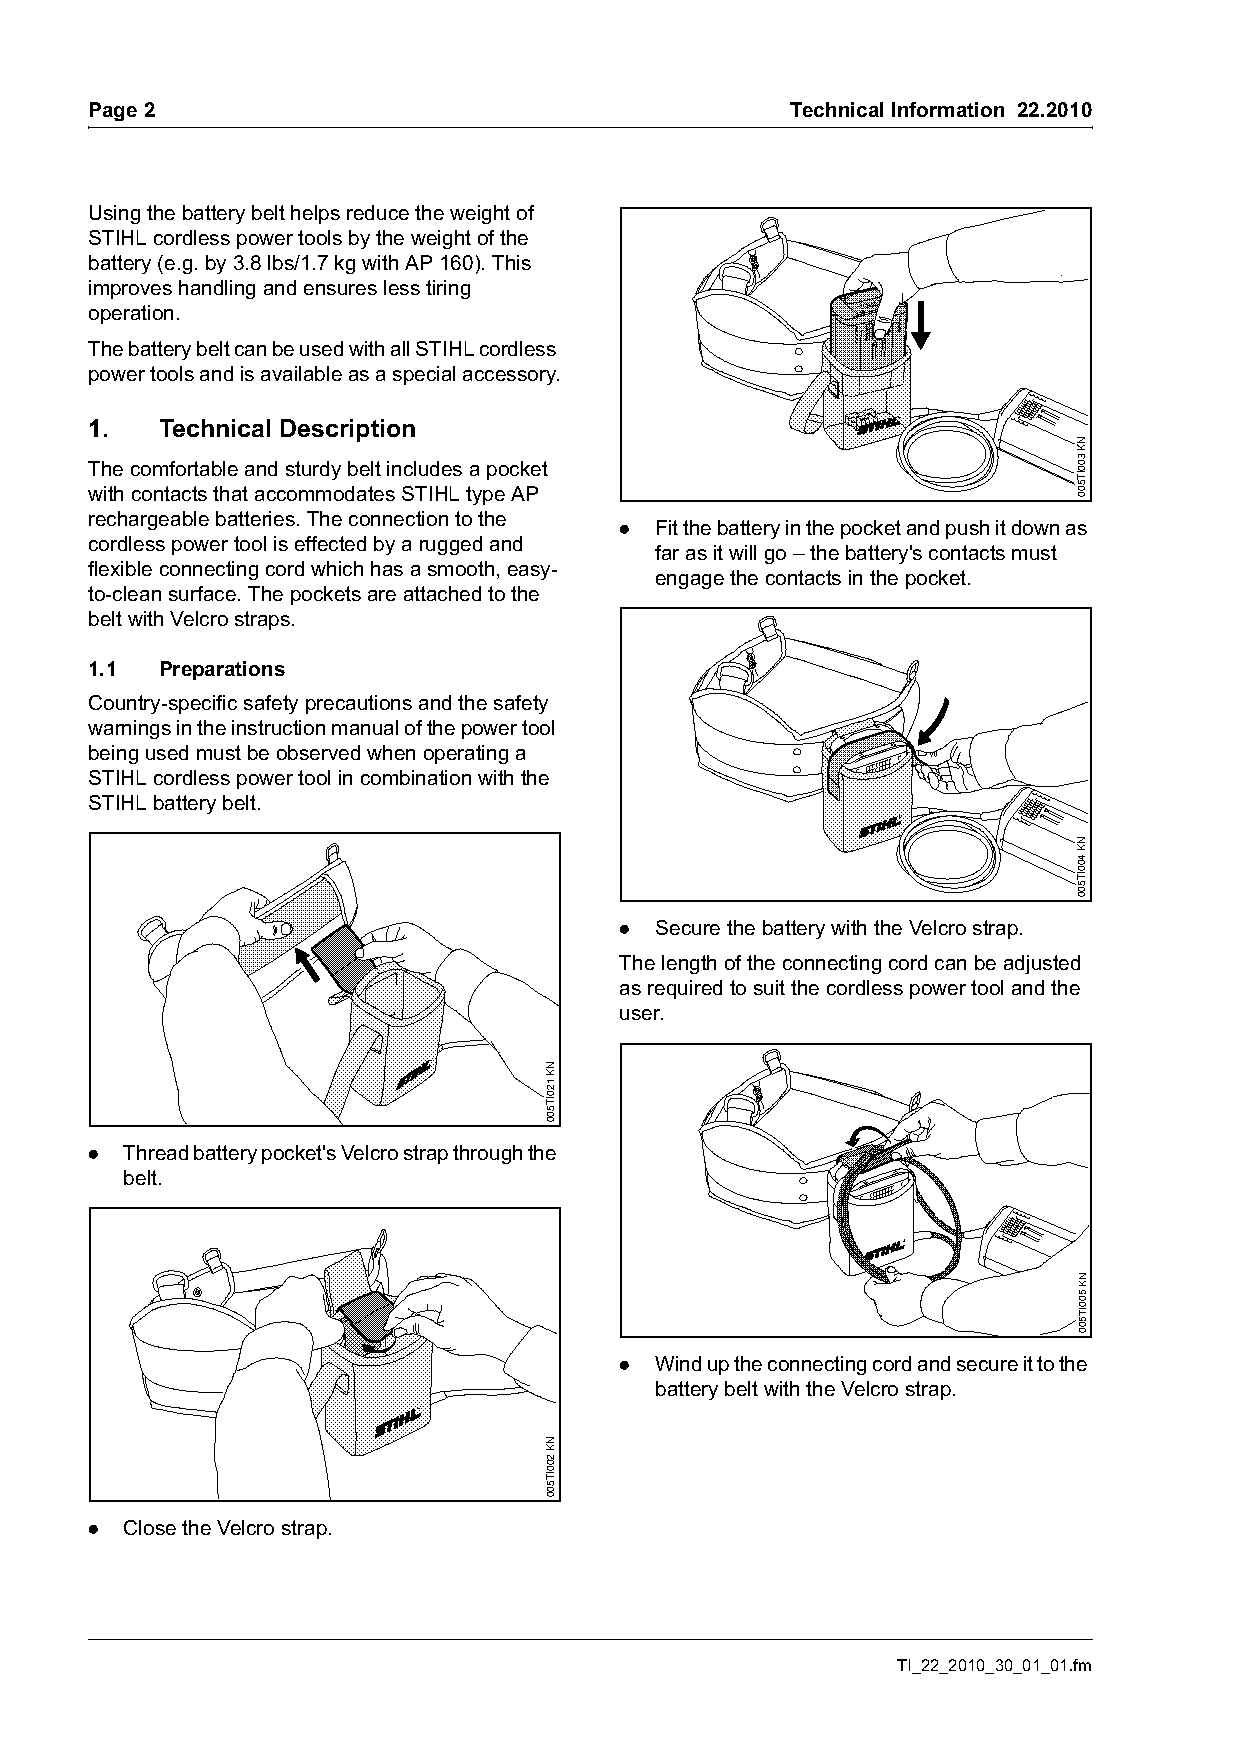
The comfortable and sturdy belt includes a pocket
with contacts that accommodates STIHL type AP
rechargeable batteries. The connection to the                      .   Fit the battery in the pocket and push it down as
cordless power tool is effected by a rugged and                        far as it will go – the battery's contacts must
flexible connecting cord which has a smooth, easy-                     engage the contacts in the pocket.
to-clean surface. The pockets are attached to the
belt with Velcro straps.

1.1      Preparations
Country-specific safety precautions and the safety
warnings in the instruction manual of the power tool
being used must be observed when operating a
STIHL cordless power tool in combination with the
STIHL battery belt.

                                                                                                                       005TI004 KN
                                                                   .   Secure the battery with the Velcro strap.
                                                                   The length of the connecting cord can be adjusted
                                                                   as required to suit the cordless power tool and the
                                                                   user.
                                                     005TI021 KN

.     Thread battery pocket's Velcro strap through the
      belt.
                                                                                                                      005TI005 KN

                                                                   .   Wind up the connecting cord and secure it to the
                                                                       battery belt with the Velcro strap.
                                                     005TI002 KN

.     Close the Velcro strap.

                                                                                                  TI_22_2010_30_01_01.fm
Page 3 of 6
Text of page 3 — search, copy, screen readers
Technical Information 22.2010                                                                                  Page 3

                                                                 1.2      Opening the battery belt

                                                   005TI006 KN

                                                                                                                      005TI009 KN
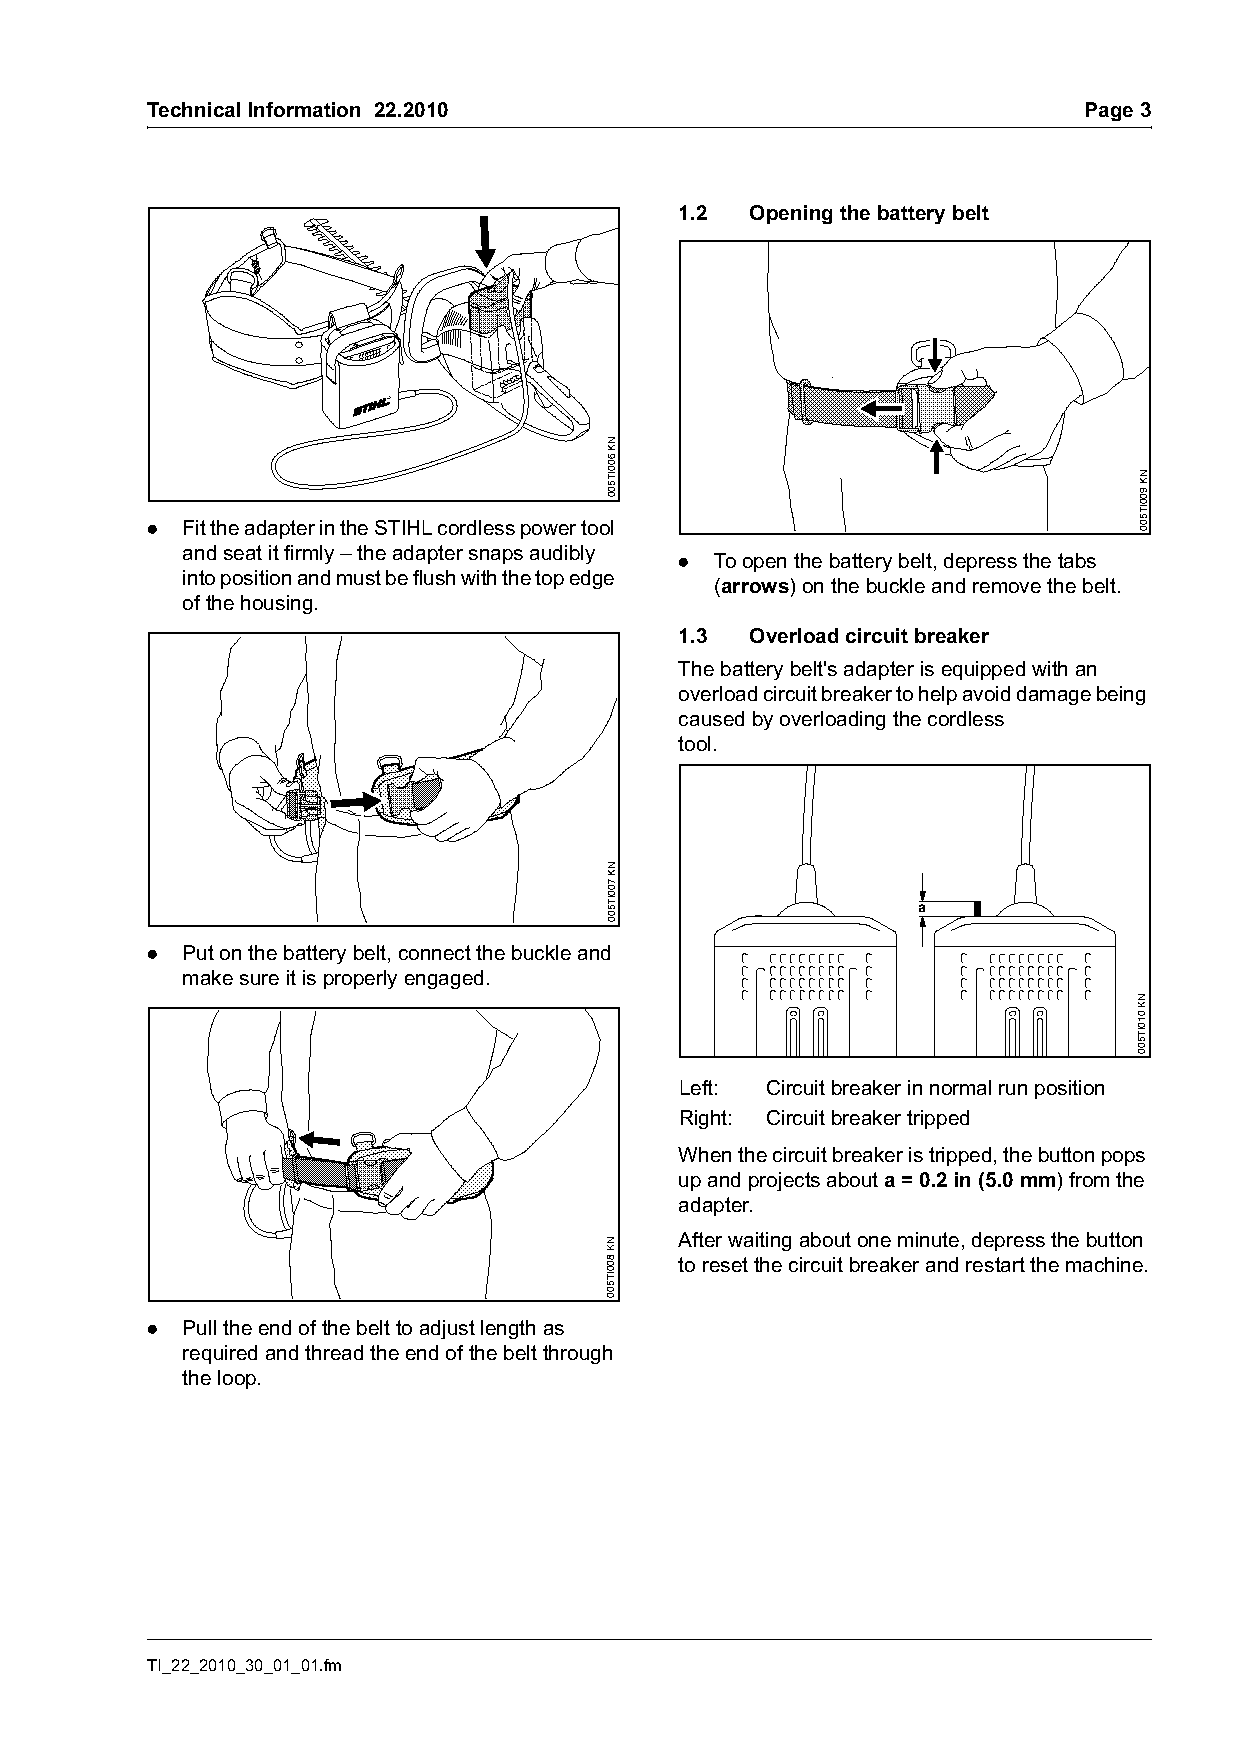
.   Fit the adapter in the STIHL cordless power tool
    and seat it firmly – the adapter snaps audibly               .     To open the battery belt, depress the tabs
    into position and must be flush with the top edge                  (arrows) on the buckle and remove the belt.
    of the housing.
                                                                 1.3      Overload circuit breaker
                                                                 The battery belt's adapter is equipped with an
                                                                 overload circuit breaker to help avoid damage being
                                                                 caused by overloading the cordless
                                                                 tool.
                                                   005TI007 KN


.   Put on the battery belt, connect the buckle and
    make sure it is properly engaged.

                                                                                                                     005TI010 KN
                                                                 Left:      Circuit breaker in normal run position
                                                                 Right:     Circuit breaker tripped
                                                                 When the circuit breaker is tripped, the button pops
                                                                 up and projects about a = 0.2 in (5.0 mm) from the
                                                                 adapter.
                                                                 After waiting about one minute, depress the button
                                                   005TI008 KN

                                                                 to reset the circuit breaker and restart the machine.

.   Pull the end of the belt to adjust length as
    required and thread the end of the belt through
    the loop.

TI_22_2010_30_01_01.fm
Page 4 of 6
Text of page 4 — search, copy, screen readers
Page 4                                                                            Technical Information 22.2010

2.       Special Accessory

2.1      Pocket

                                                                       1
                                                                                            1


                                                  005TI019 KN

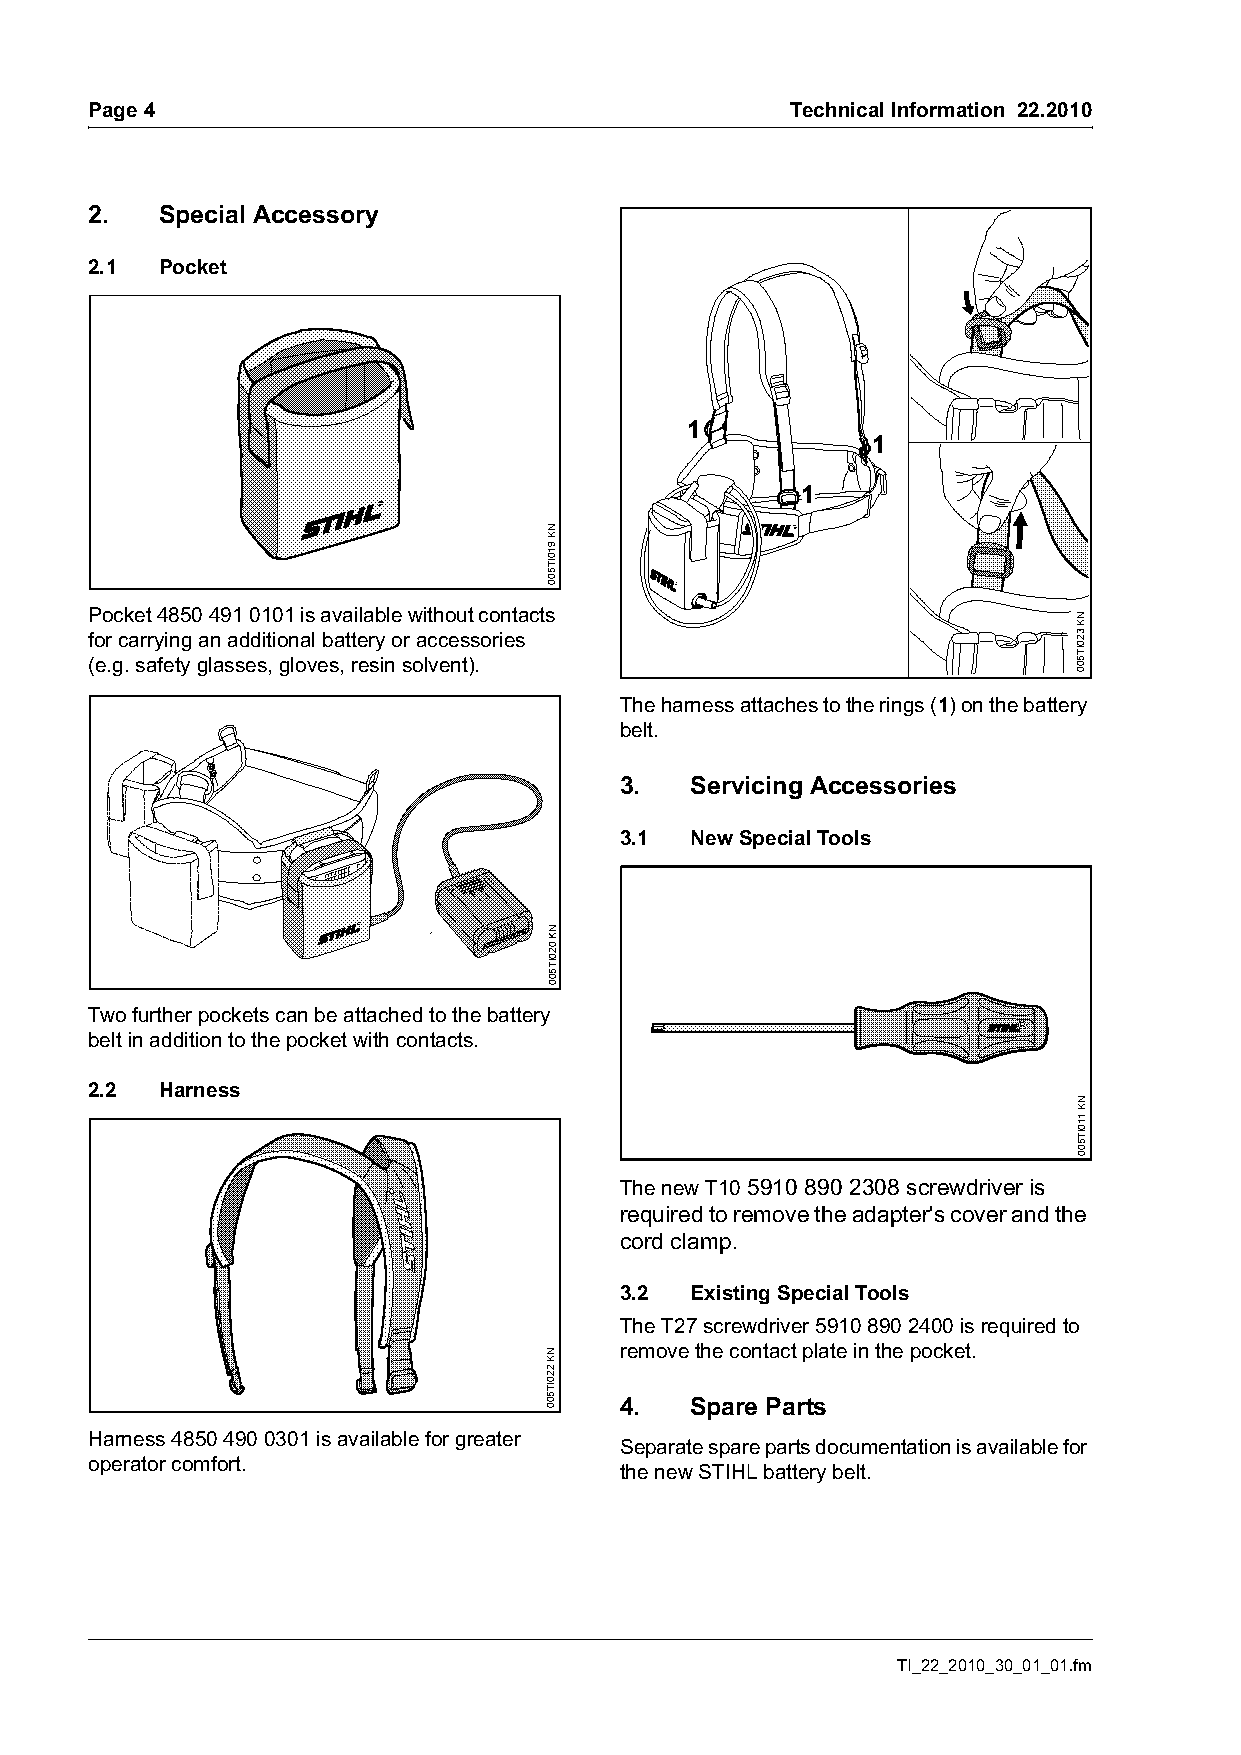
Pocket 4850 491 0101 is available without contacts

                                                                                                                    005TI023 KN
for carrying an additional battery or accessories
(e.g. safety glasses, gloves, resin solvent).
                                                                The harness attaches to the rings (1) on the battery
                                                                belt.

                                                                3.     Servicing Accessories

                                                                3.1    New Special Tools
                                                  005TI020 KN

Two further pockets can be attached to the battery
belt in addition to the pocket with contacts.

2.2      Harness
                                                                                                                     005TI011 KN

                                                                The new T10 5910 890 2308 screwdriver is
                                                                required to remove the adapter's cover and the
                                                                cord clamp.

                                                                3.2    Existing Special Tools
                                                                The T27 screwdriver 5910 890 2400 is required to
                                                                remove the contact plate in the pocket.
                                                 005TI022 KN

                                                                4.     Spare Parts
Harness 4850 490 0301 is available for greater                  Separate spare parts documentation is available for
operator comfort.                                               the new STIHL battery belt.

                                                                                                TI_22_2010_30_01_01.fm
Page 5 of 6
Text of page 5 — search, copy, screen readers
Technical Information 22.2010                                                                                     Page 5

5.       Repairs
              Before carrying out any repairs,
              remove the battery from the belt and
              disconnect the belt from the power                                                 2
              tool.

5.1      Removing the Wiring Harness                                                        1
                                                                                                       1

                                                                                                                        005TI014 KN
                                                                                      3

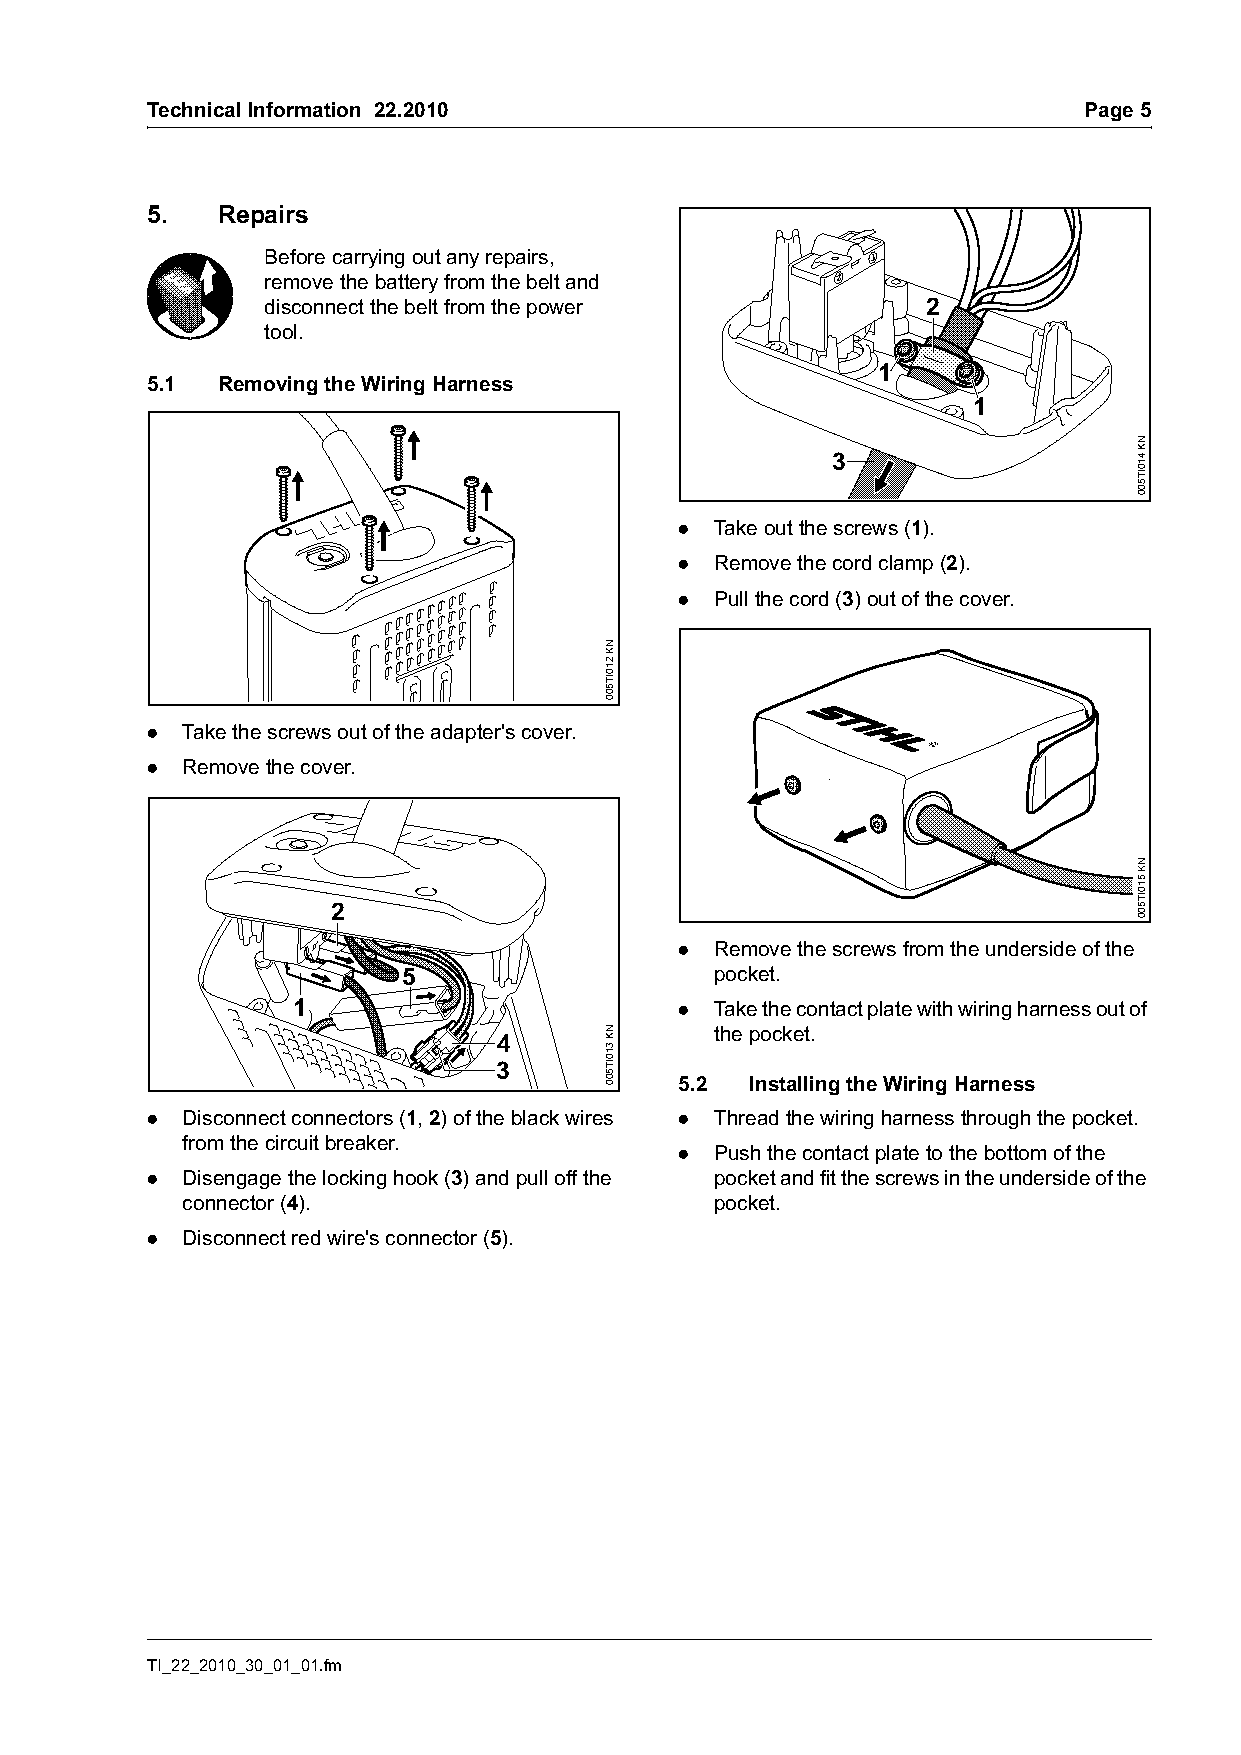
                                                                   .     Take out the screws (1).
                                                                   .     Remove the cord clamp (2).

                                                     005TI012 KN
                                                                   .     Pull the cord (3) out of the cover.

.     Take the screws out of the adapter's cover.
.     Remove the cover.

                                                                                                                        005TI015 KN
                      2
                                                                   .     Remove the screws from the underside of the
                              5                                          pocket.
                  1                                                .     Take the contact plate with wiring harness out of
                                                                         the pocket.
                                                     005TI013 KN

                                        4
                                        3
                                                                   5.2       Installing the Wiring Harness
.     Disconnect connectors (1, 2) of the black wires              .     Thread the wiring harness through the pocket.
      from the circuit breaker.                                    .     Push the contact plate to the bottom of the
.     Disengage the locking hook (3) and pull off the                    pocket and fit the screws in the underside of the
      connector (4).                                                     pocket.
.     Disconnect red wire's connector (5).

TI_22_2010_30_01_01.fm
Page 6 of 6
Text of page 6 — search, copy, screen readers
Page 6                                                                                Technical Information 22.2010

                                                                  5.3      Removing the Circuit Breaker
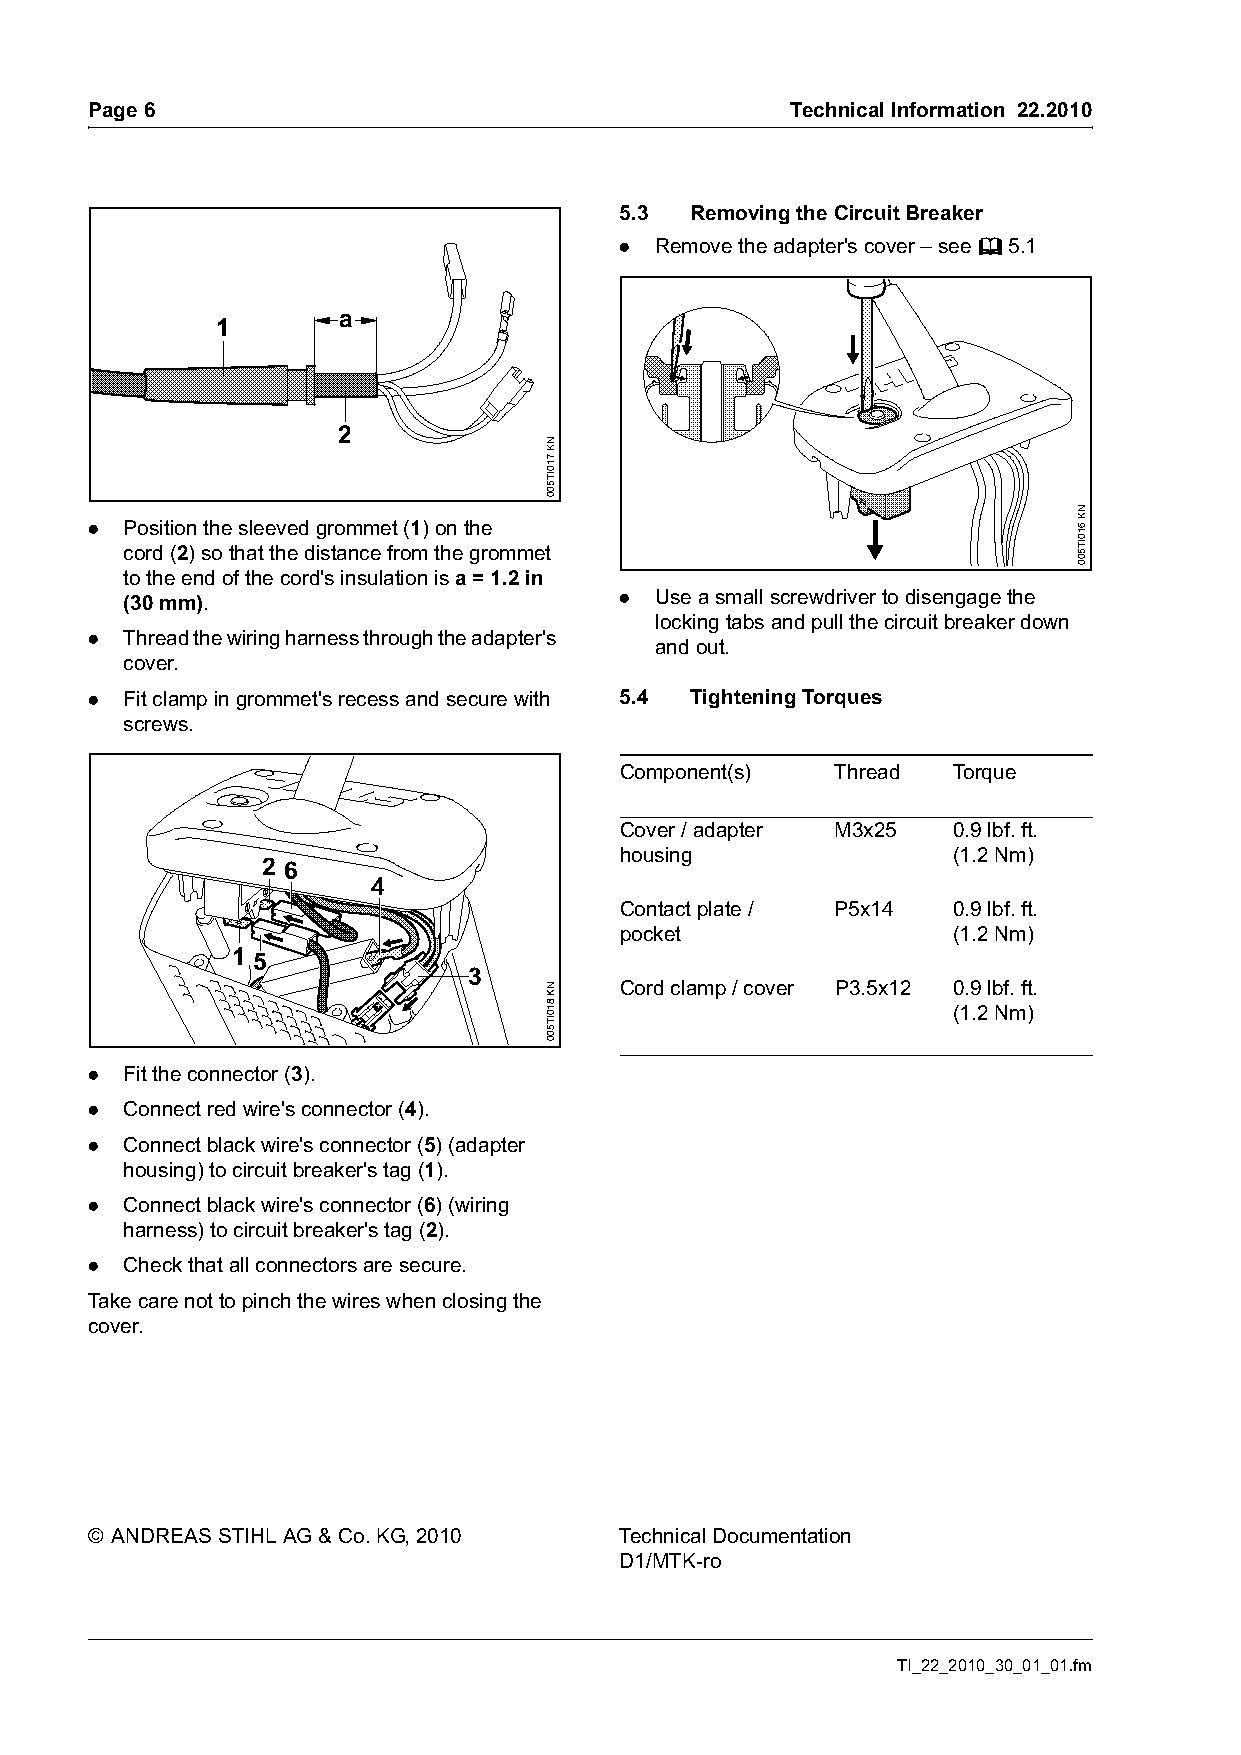
                                                                  .     Remove the adapter's cover – see b 5.1

              1              a


                                                    005TI017 KN

                                                                                                                         005TI016 KN
.   Position the sleeved grommet (1) on the
    cord (2) so that the distance from the grommet
    to the end of the cord's insulation is a = 1.2 in
    (30 mm).                                                      .     Use a small screwdriver to disengage the
                                                                        locking tabs and pull the circuit breaker down
.   Thread the wiring harness through the adapter's                     and out.
    cover.
.   Fit clamp in grommet's recess and secure with                 5.4      Tightening Torques
    screws.

                                                                  Component(s)             Thread        Torque

                                                                  Cover / adapter          M3x25         0.9 lbf. ft.
                                                                  housing                                (1.2 Nm)
                   26
                                 4
                                                                  Contact plate /          P5x14         0.9 lbf. ft.
                                                                  pocket                                 (1.2 Nm)
                  15
                                            3                     Cord clamp / cover       P3.5x12       0.9 lbf. ft.
                                                    005TI018 KN

                                                                                                         (1.2 Nm)

.   Fit the connector (3).
.   Connect red wire's connector (4).
.   Connect black wire's connector (5) (adapter
    housing) to circuit breaker's tag (1).
.   Connect black wire's connector (6) (wiring
    harness) to circuit breaker's tag (2).
.   Check that all connectors are secure.
Take care not to pinch the wires when closing the
cover.

© ANDREAS STIHL AG & Co. KG, 2010                                 Technical Documentation
                                                                  D1/MTK-ro

                                                                                                   TI_22_2010_30_01_01.fm
Most of these PDFs embed fonts with a shifted character map, so the text above was recovered rather than copied — read it as a faithful but imperfect transcription, and treat the page image above each block as the authority where the two disagree — the figures exist only there, because they are vector drawings that text extraction cannot keep.