Technical Information · issue 8 of 2011
New cordless chain saw STIHL MSA 160 C
IssueTI 8/2011
Full text
Page 1 of 21
Text of page 1 — search, copy, screen readers
STIH)

Technical Information                                    08.2011

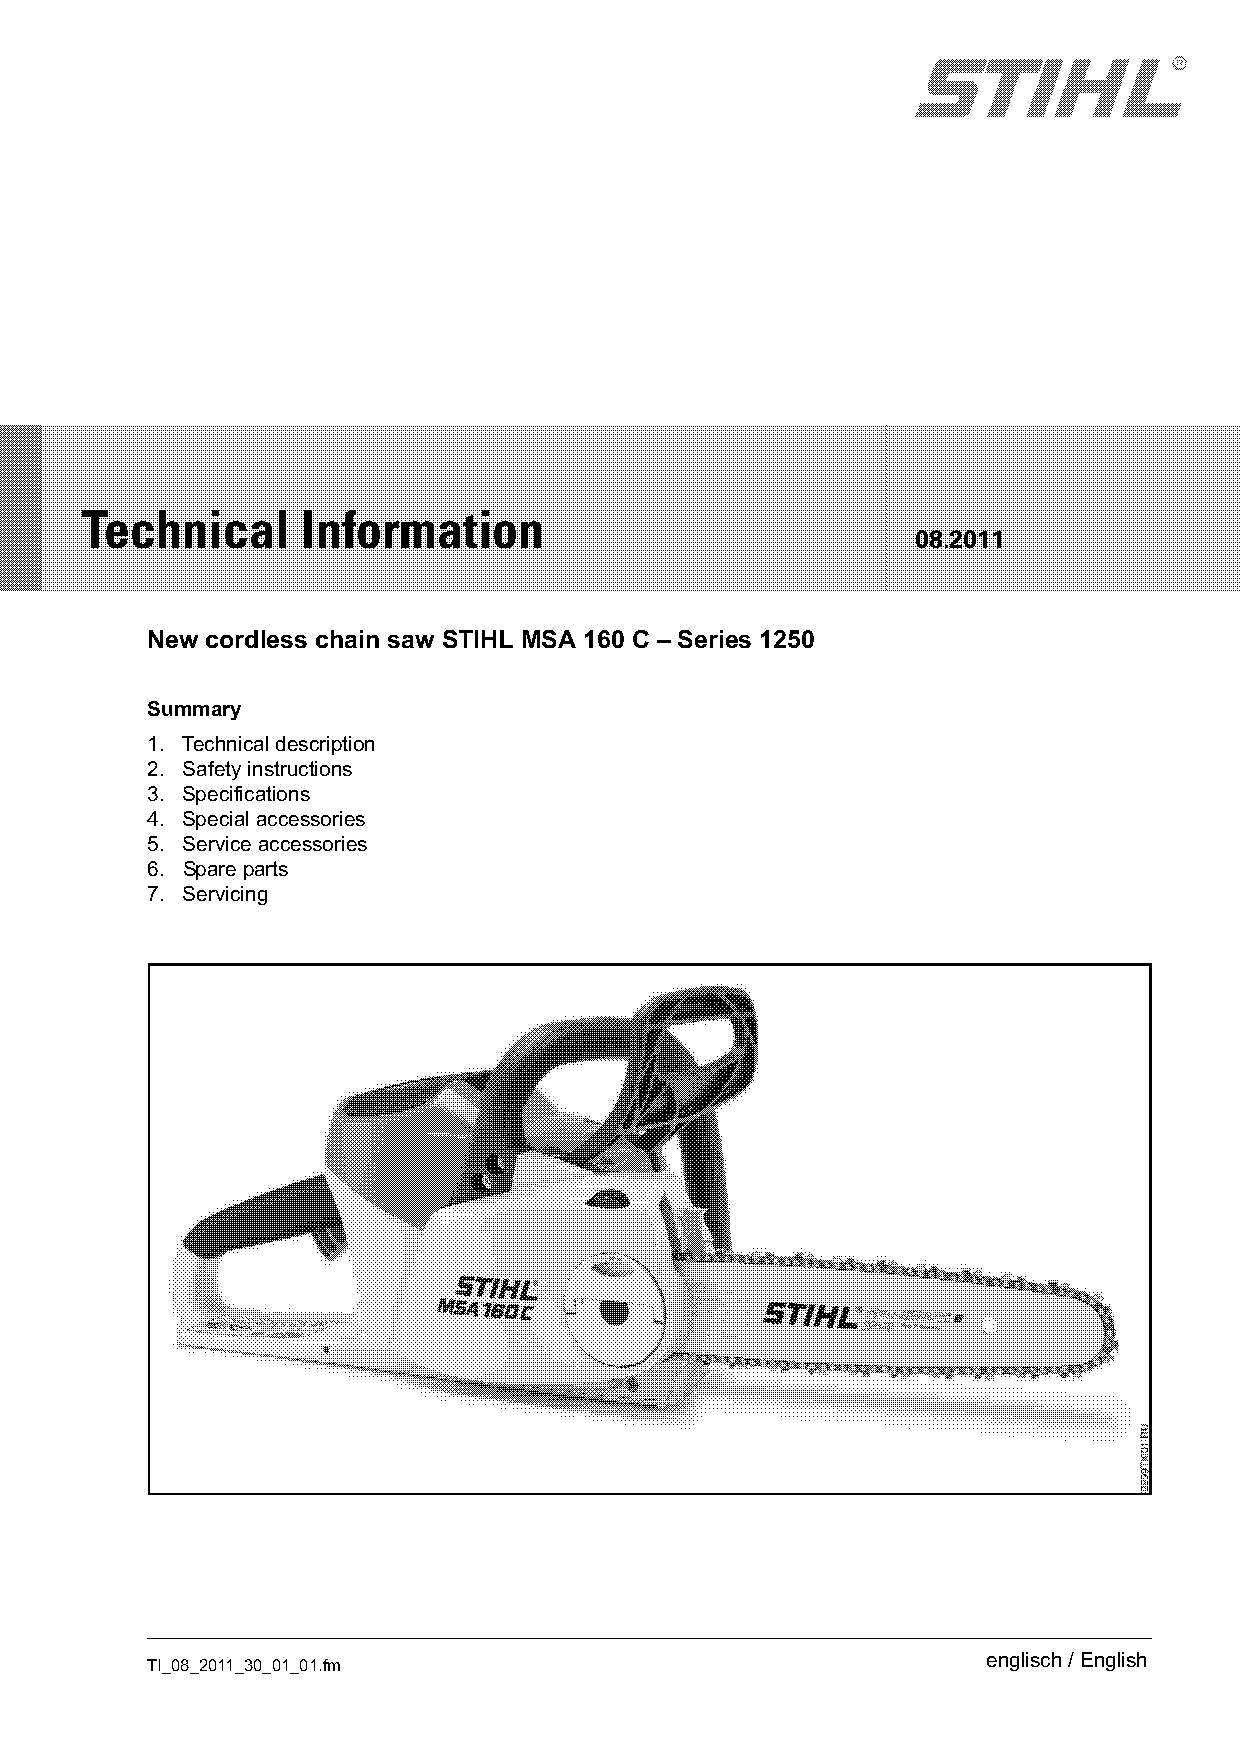
  New cordless chain saw STIHL MSA 160 C – Series 1250

  Summary
  1.   Technical description
  2.   Safety instructions
  3.   Specifications
  4.   Special accessories
  5.   Service accessories
  6.   Spare parts
  7.   Servicing

  TI_08_2011_30_01_01.fm                                      englisch / English
Page 2 of 21
Text of page 2 — search, copy, screen readers
Page 2                                                                   Technical Information 08.2011

The STIHL Lithium Ion battery platform is being        1.     Technical description
expanded by the new, powerful STIHL cordless
chain saw MSA 160 C.                                   1.1    Functional principle
Sophisticated lithium ion technology, the new 1/4"     The STIHL MSA 160 C cordless chain saw is
STIHL PICCO™ Micro™ saw chain and the high             powered by a rechargeable battery.
performance of the electric motor reveal to the user
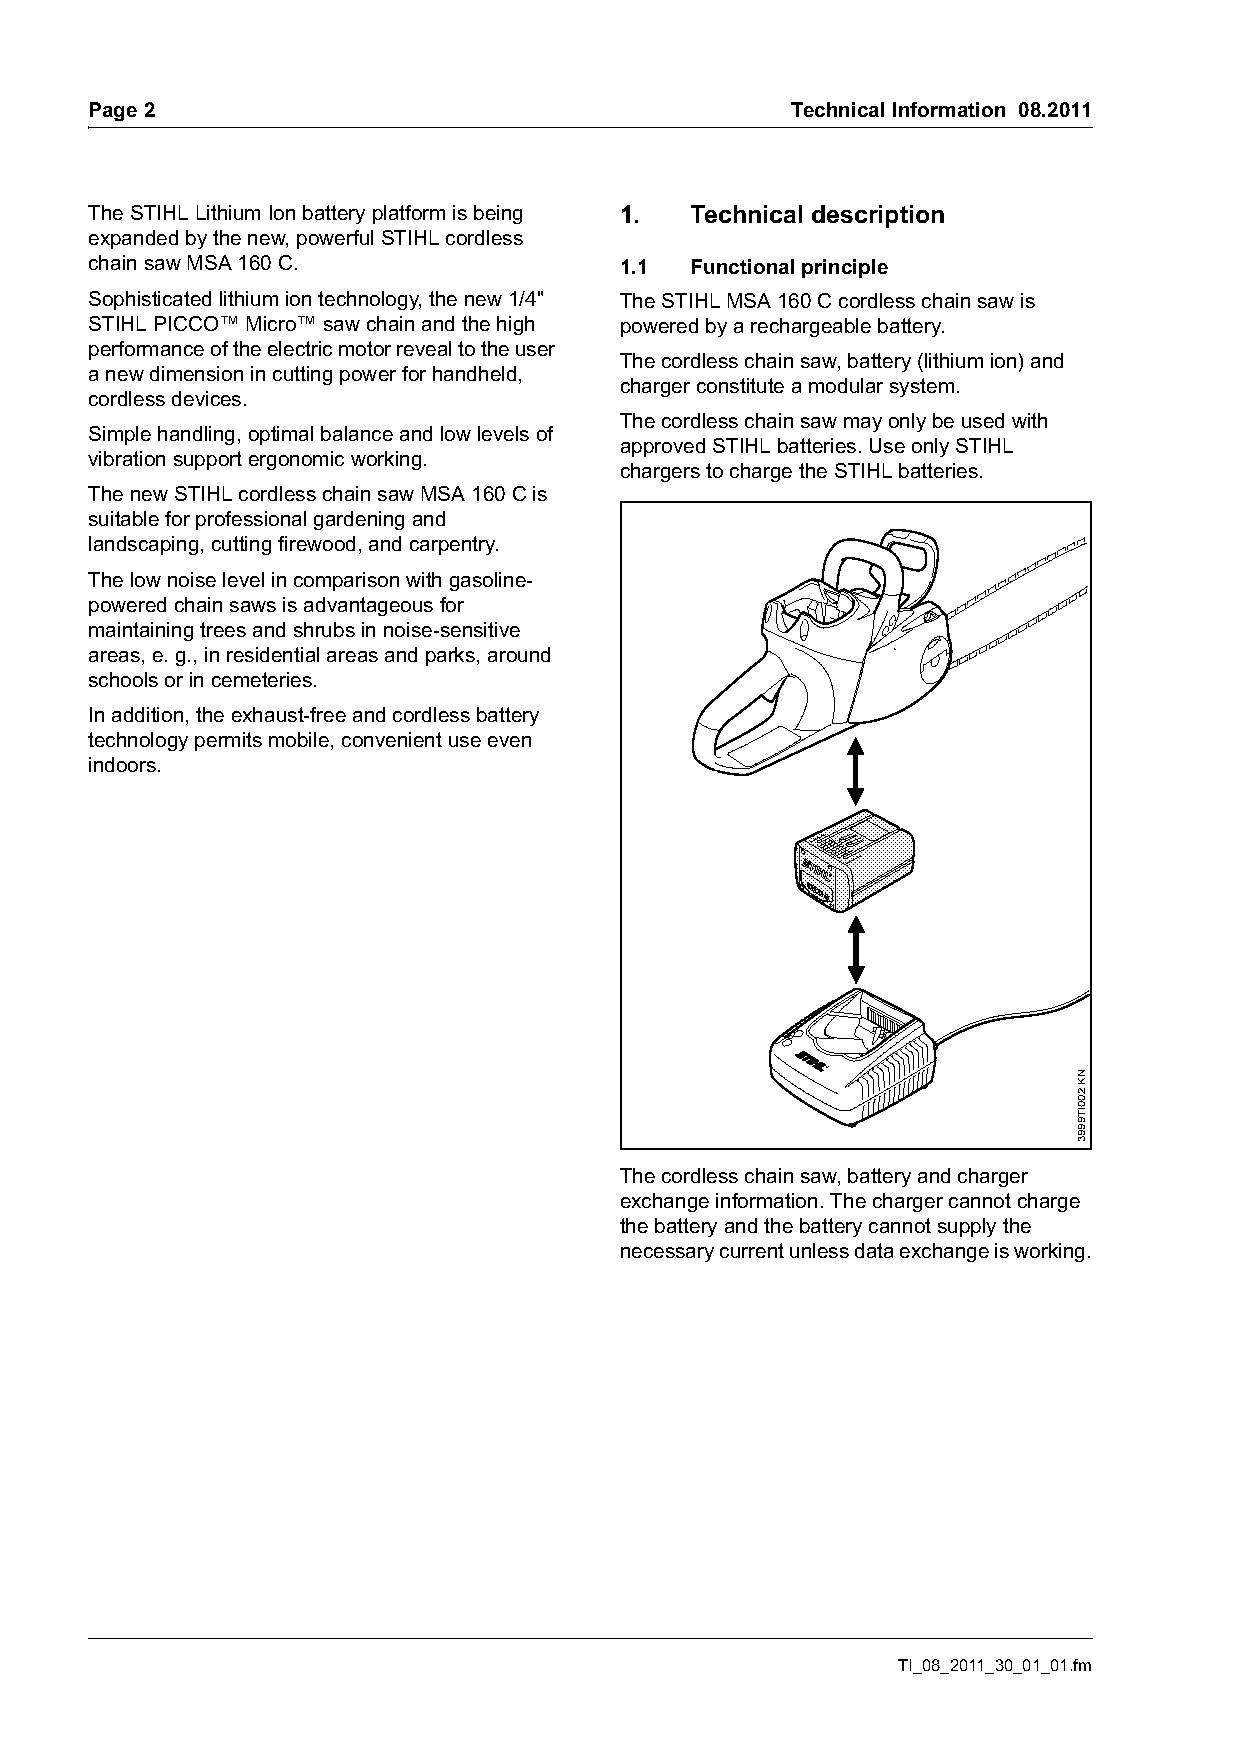
                                                       The cordless chain saw, battery (lithium ion) and
a new dimension in cutting power for handheld,
                                                       charger constitute a modular system.
cordless devices.
                                                       The cordless chain saw may only be used with
Simple handling, optimal balance and low levels of
                                                       approved STIHL batteries. Use only STIHL
vibration support ergonomic working.
                                                       chargers to charge the STIHL batteries.
The new STIHL cordless chain saw MSA 160 C is
suitable for professional gardening and
landscaping, cutting firewood, and carpentry.
The low noise level in comparison with gasoline-
powered chain saws is advantageous for
maintaining trees and shrubs in noise-sensitive
areas, e. g., in residential areas and parks, around
schools or in cemeteries.
In addition, the exhaust-free and cordless battery
technology permits mobile, convenient use even
indoors.

                                                                                                           3999TI002 KN

                                                       The cordless chain saw, battery and charger
                                                       exchange information. The charger cannot charge
                                                       the battery and the battery cannot supply the
                                                       necessary current unless data exchange is working.

                                                                                     TI_08_2011_30_01_01.fm
Page 3 of 21
Text of page 3 — search, copy, screen readers
Technical Information 08.2011                                                                            Page 3

1.2     Electric motor and electronics module             1.4      Hand guard
The saw chain of the cordless chain saw is powered
with the help of a brushless electric motor. Unlike
other DC motors with carbon brushes, control and
position detection of the electric motor is entirely                                                       1
electronic. In this way, it is possible to attain high
torque and very low wear and space requirements
at the same time, as well as low noise levels, without
using a transmission.
An electronics module transforms the voltage of the

                                                                                                                3999TI003 KN
battery into the voltage required on the electric
motor and controls the electric motor according to
the switch state of the trigger switch. The electronics
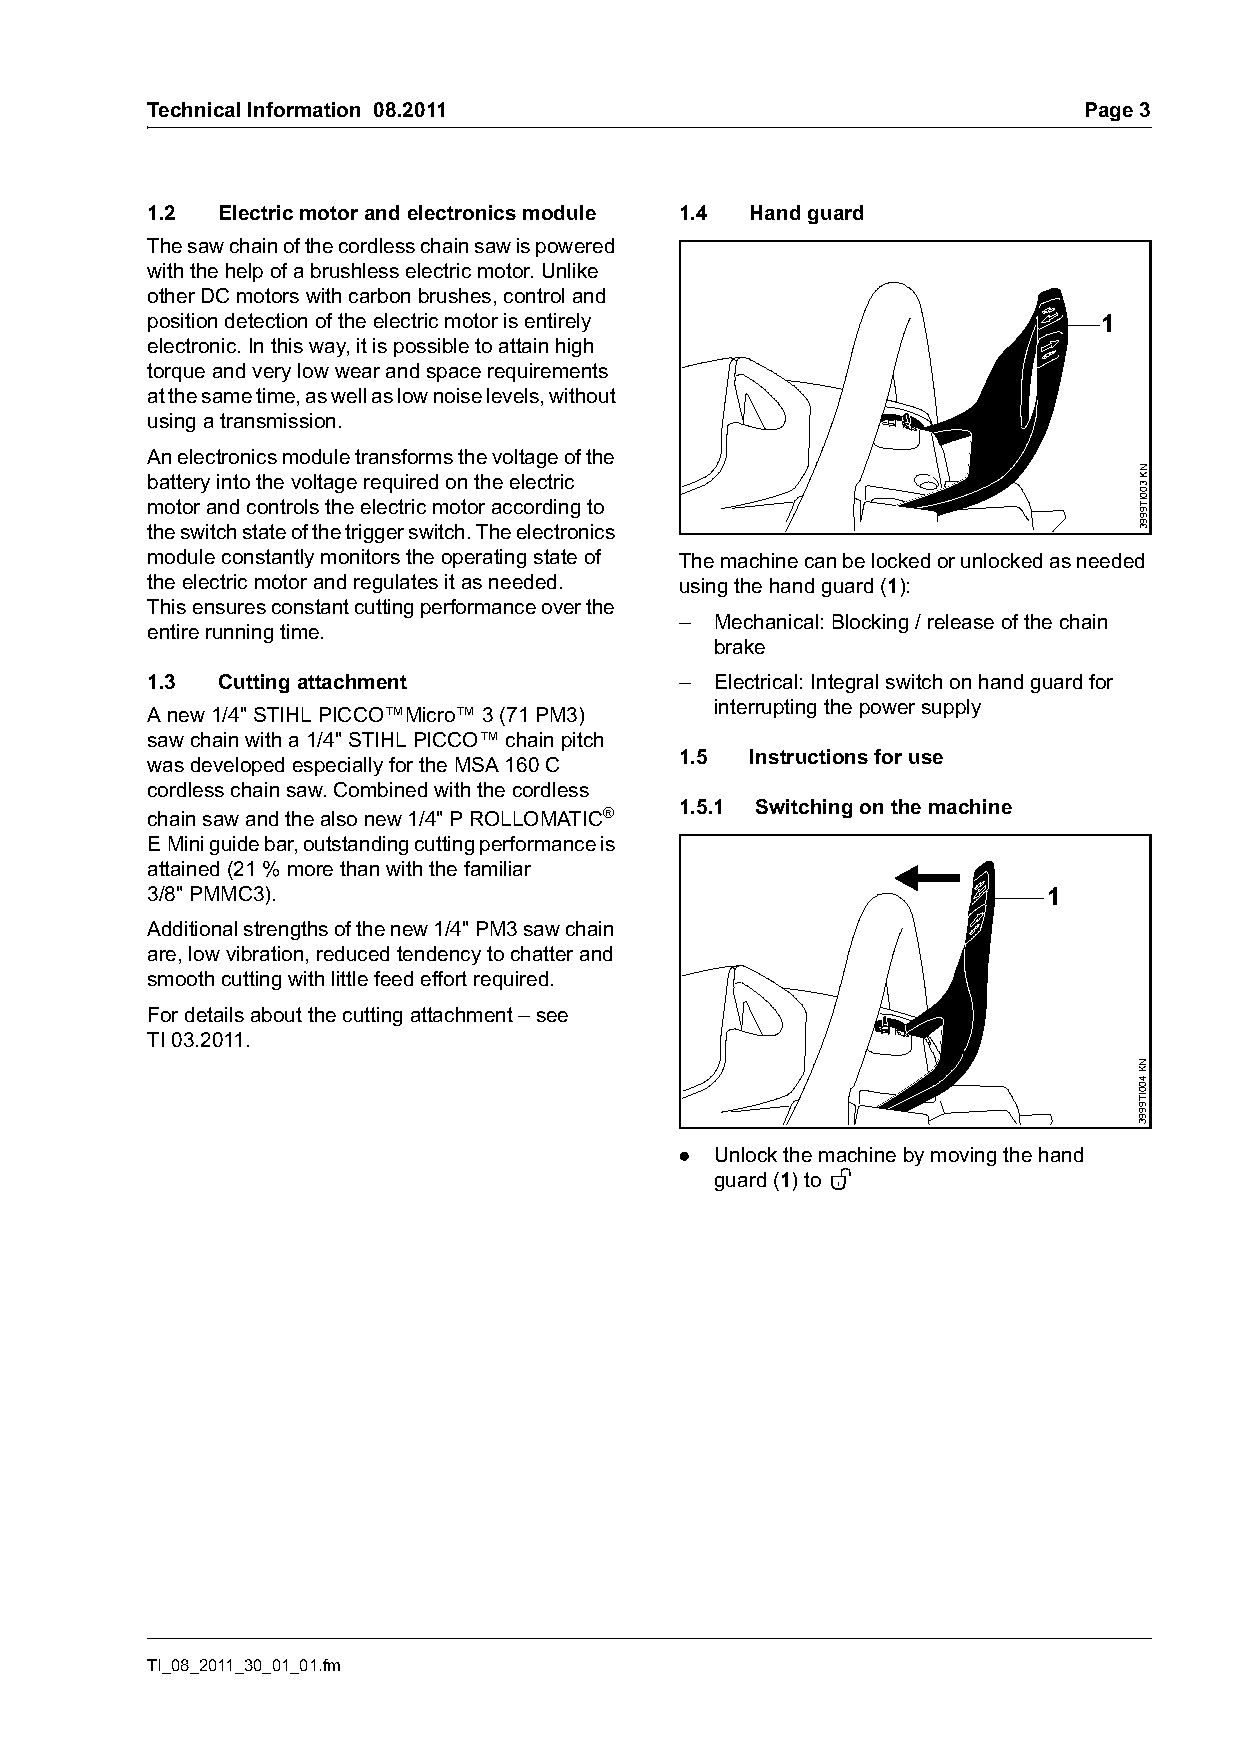
module constantly monitors the operating state of         The machine can be locked or unlocked as needed
the electric motor and regulates it as needed.            using the hand guard (1):
This ensures constant cutting performance over the
entire running time.                                      –     Mechanical: Blocking / release of the chain
                                                                brake
1.3     Cutting attachment                                –     Electrical: Integral switch on hand guard for
A new 1/4" STIHL PICCO™Micro™ 3 (71 PM3)                        interrupting the power supply
saw chain with a 1/4" STIHL PICCO™ chain pitch
was developed especially for the MSA 160 C                1.5      Instructions for use
cordless chain saw. Combined with the cordless
                                                          1.5.1     Switching on the machine
chain saw and the also new 1/4" P ROLLOMATIC®
E Mini guide bar, outstanding cutting performance is
attained (21 % more than with the familiar
3/8" PMMC3).                                                                                         1
Additional strengths of the new 1/4" PM3 saw chain
are, low vibration, reduced tendency to chatter and
smooth cutting with little feed effort required.
For details about the cutting attachment – see
TI 03.2011.

                                                                                                                3999TI004 KN
                                                          .     Unlock the machine by moving the hand
                                                                guard (1) to ‚

TI_08_2011_30_01_01.fm
Page 4 of 21
Text of page 4 — search, copy, screen readers
Page 4                                                                                     Technical Information 08.2011

                               2                                                                                      1


                                                        3999TI005 KN

                                                                                                                          3999TI007 KN
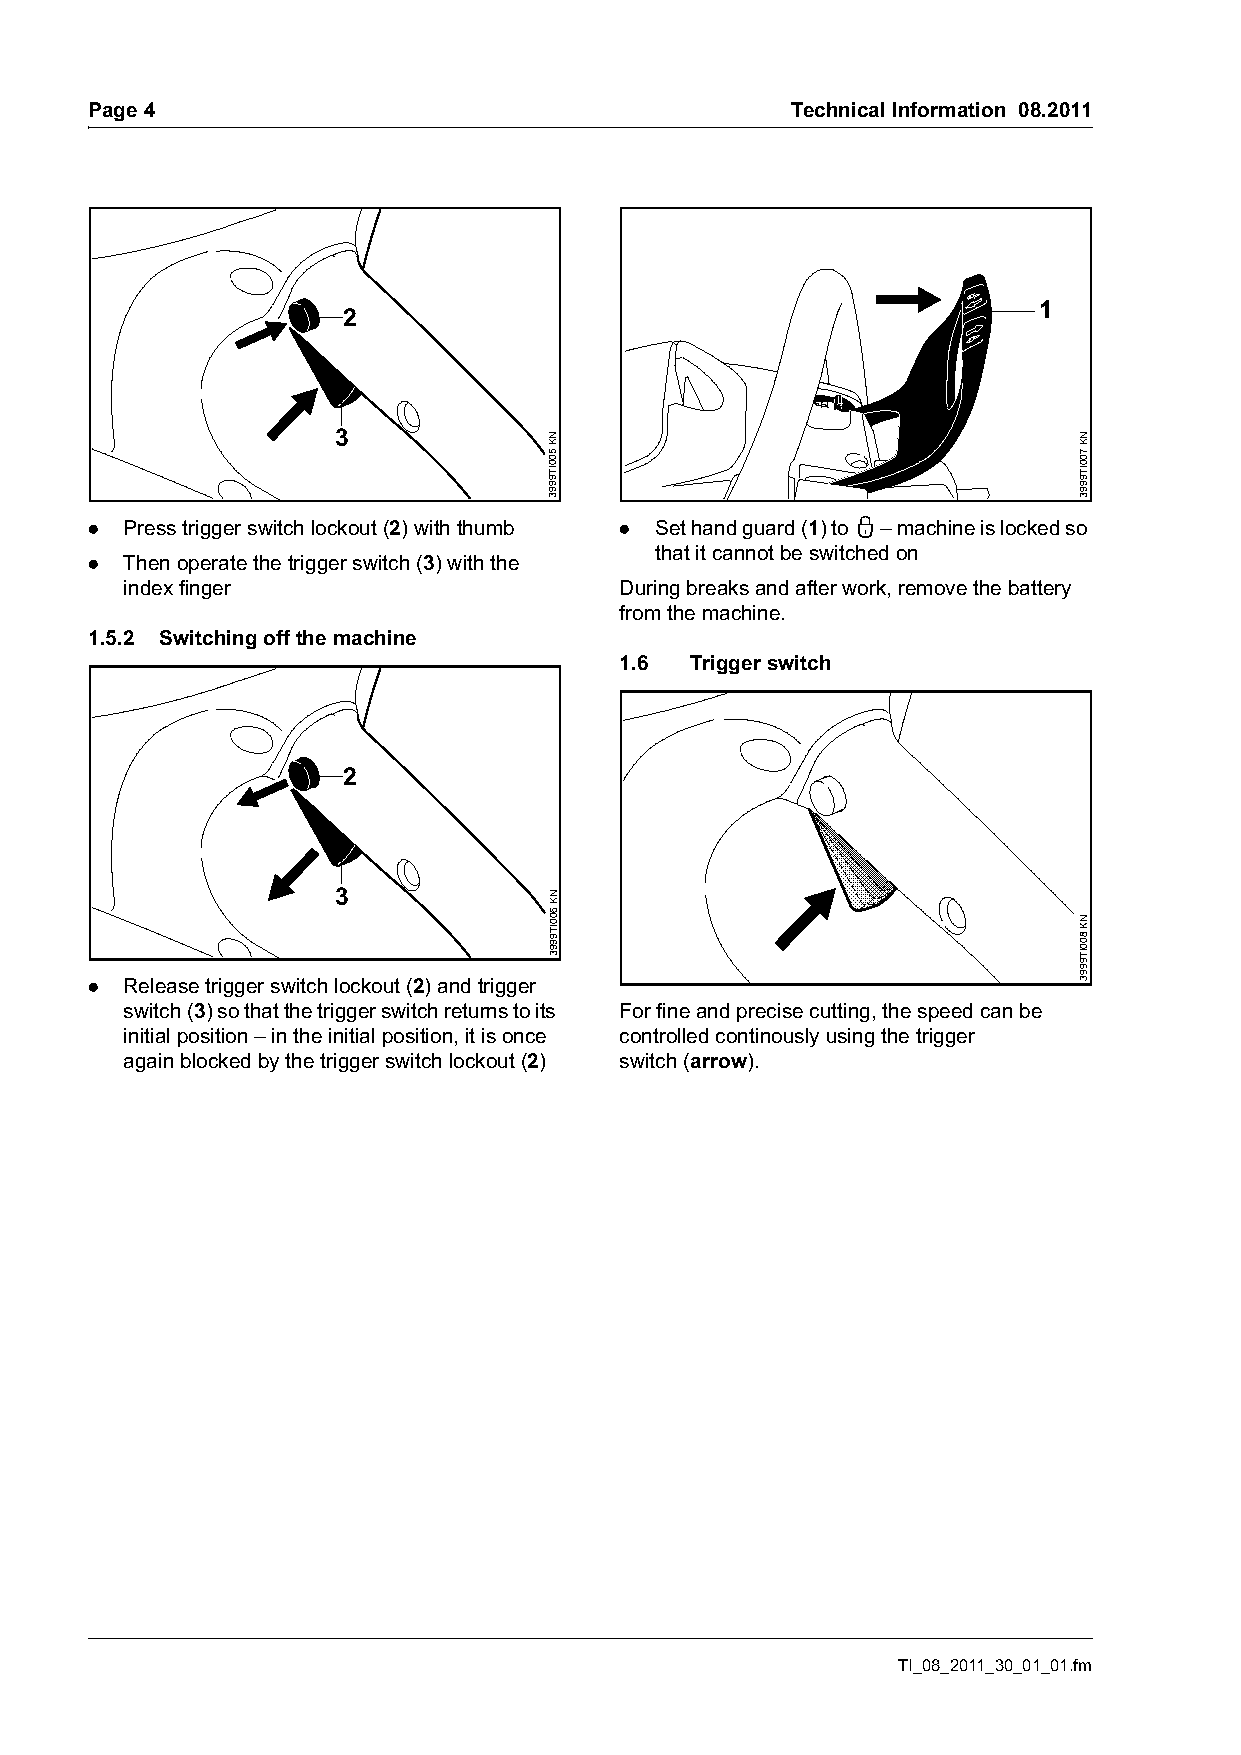
.   Press trigger switch lockout (2) with thumb                        .     Set hand guard (1) to ƒ – machine is locked so
                                                                             that it cannot be switched on
.   Then operate the trigger switch (3) with the
    index finger                                                       During breaks and after work, remove the battery
                                                                       from the machine.
1.5.2    Switching off the machine
                                                                       1.6      Trigger switch


                              3
                                                        3999TI006 KN

                                                                                                                          3999TI008 KN
.   Release trigger switch lockout (2) and trigger
    switch (3) so that the trigger switch returns to its               For fine and precise cutting, the speed can be
    initial position – in the initial position, it is once             controlled continously using the trigger
    again blocked by the trigger switch lockout (2)                    switch (arrow).

                                                                                                      TI_08_2011_30_01_01.fm
Page 5 of 21
Text of page 5 — search, copy, screen readers
Technical Information 08.2011                                                       Page 5

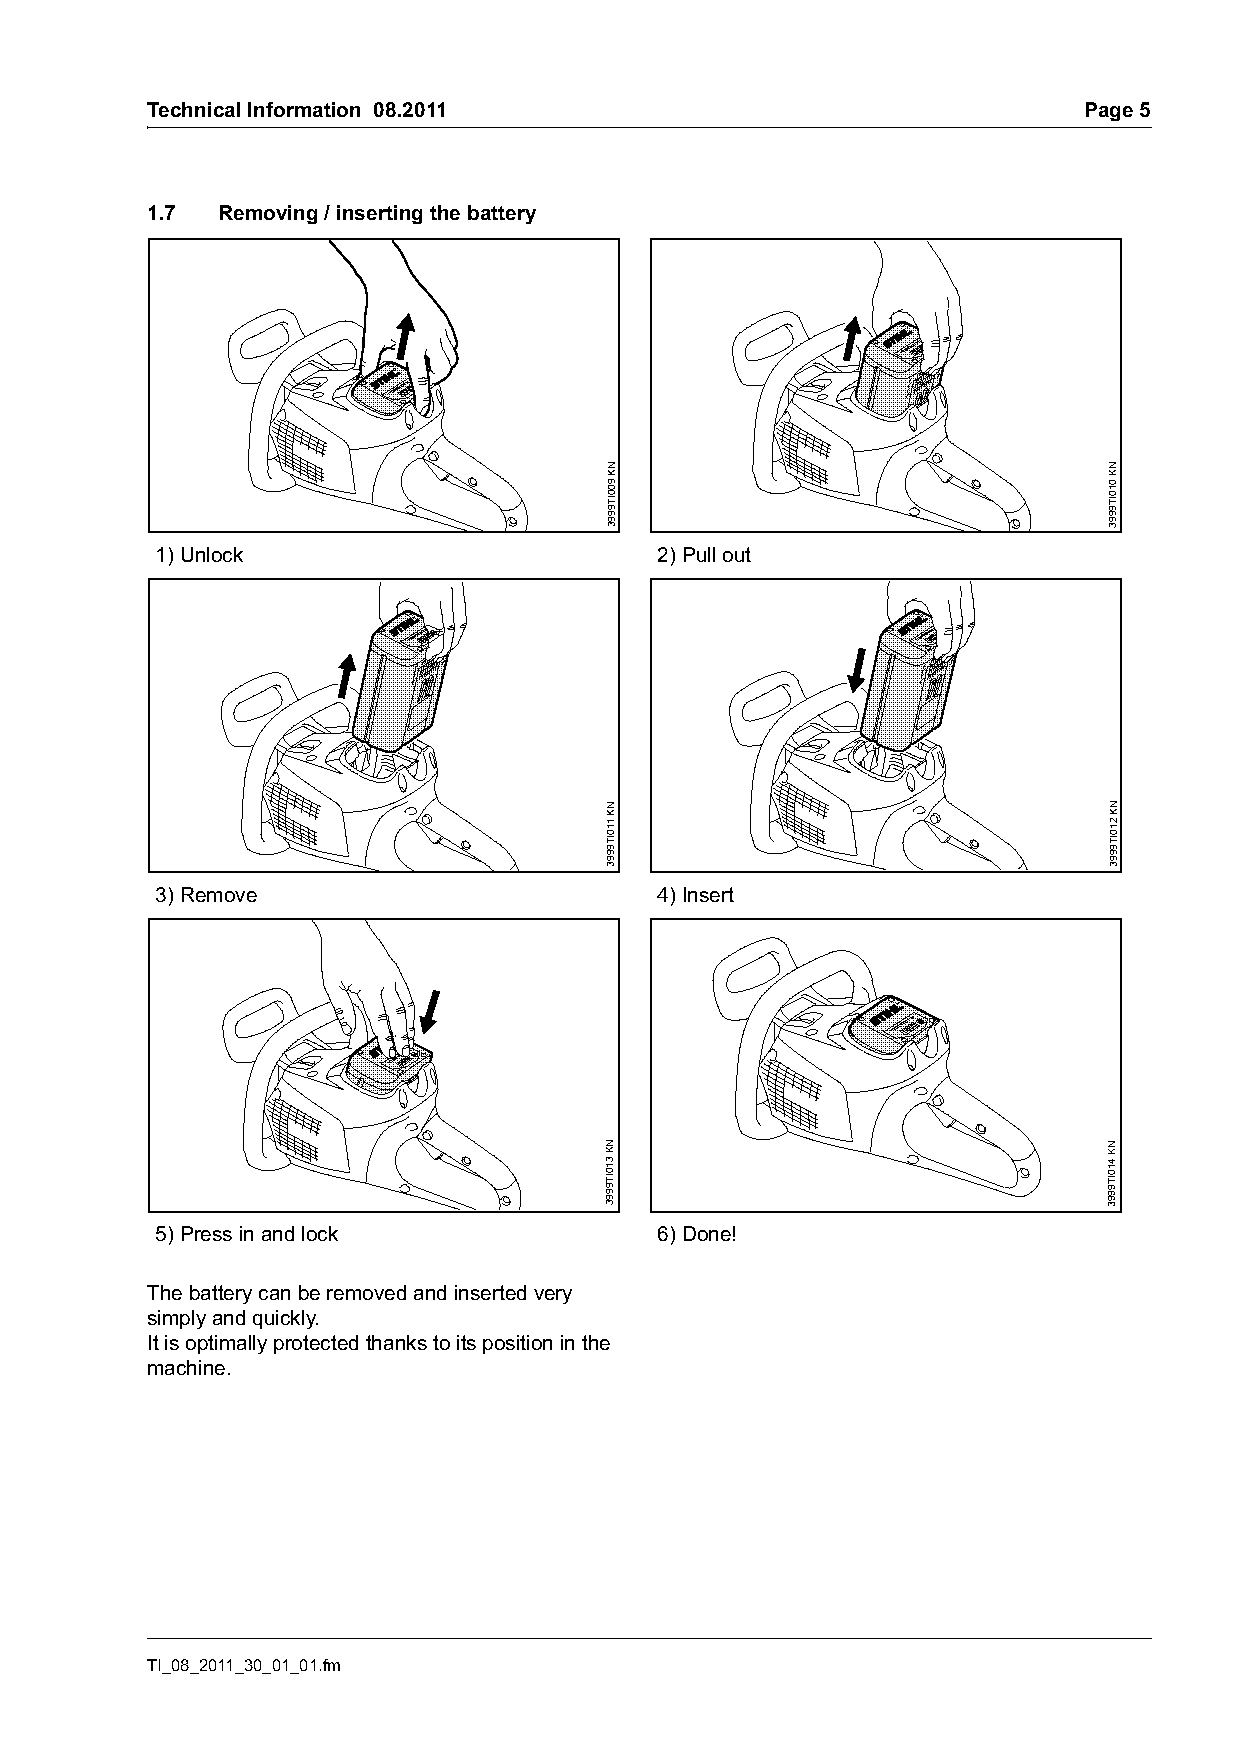
1.7     Removing / inserting the battery

                                                       3999TI009 KN

                                                                                      3999TI010 KN
1) Unlock                                                             2) Pull out

                                                                                       3999TI012 KN
                                                       3999TI011 KN

3) Remove                                                             4) Insert
                                                      3999TI013 KN

                                                                                     3999TI014 KN

5) Press in and lock                                                  6) Done!

The battery can be removed and inserted very
simply and quickly.
It is optimally protected thanks to its position in the
machine.

TI_08_2011_30_01_01.fm
Page 6 of 21
Text of page 6 — search, copy, screen readers
Page 6                                                                                      Technical Information 08.2011

1.8       Battery                                                       1.8.2   Structure
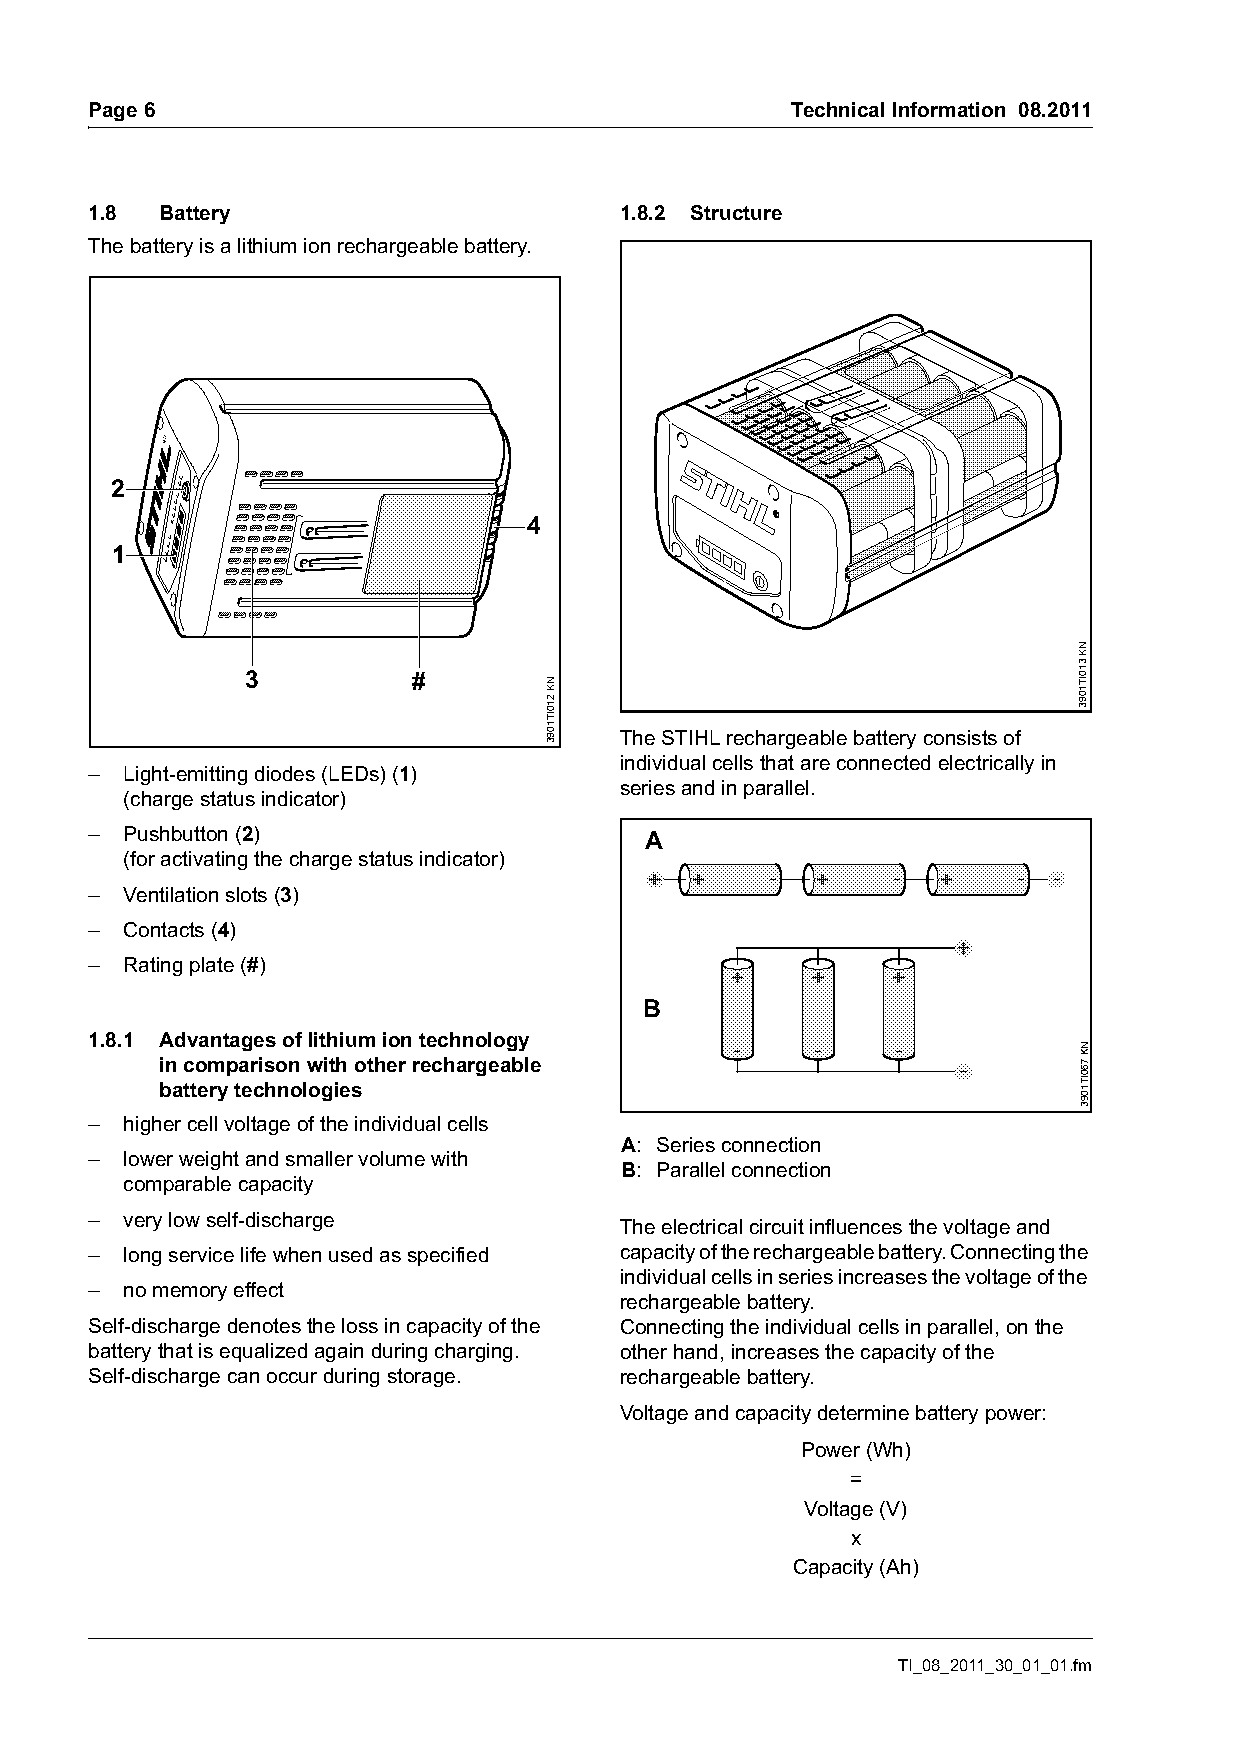
The battery is a lithium ion rechargeable battery.

    2
                                                     4
    1

                                                                                                                              3901TI013 KN
                     3                 #
                                                         3901TI012 KN

                                                                        The STIHL rechargeable battery consists of
                                                                        individual cells that are connected electrically in
–     Light-emitting diodes (LEDs) (1)
                                                                        series and in parallel.
      (charge status indicator)
–     Pushbutton (2)                                                      A
      (for activating the charge status indicator)
–     Ventilation slots (3)
–     Contacts (4)
–     Rating plate (#)

                                                                          B
1.8.1     Advantages of lithium ion technology
                                                                                                                                3901TI067 KN
          in comparison with other rechargeable
          battery technologies
–     higher cell voltage of the individual cells
                                                                        A: Series connection
–     lower weight and smaller volume with
                                                                        B: Parallel connection
      comparable capacity
–     very low self-discharge                                           The electrical circuit influences the voltage and
–     long service life when used as specified                          capacity of the rechargeable battery. Connecting the
                                                                        individual cells in series increases the voltage of the
–     no memory effect
                                                                        rechargeable battery.
Self-discharge denotes the loss in capacity of the                      Connecting the individual cells in parallel, on the
battery that is equalized again during charging.                        other hand, increases the capacity of the
Self-discharge can occur during storage.                                rechargeable battery.
                                                                        Voltage and capacity determine battery power:
                                                                                             Power (Wh)
                                                                                                  =
                                                                                             Voltage (V)
                                                                                                  x
                                                                                            Capacity (Ah)

                                                                                                        TI_08_2011_30_01_01.fm
Page 7 of 21
Text of page 7 — search, copy, screen readers
Technical Information 08.2011                                                                                Page 7

The individual cells are mechanically protected in
a rugged housing and secured against vibration in
a cage.

1.8.3   Light-emitting diodes (LEDs) on battery
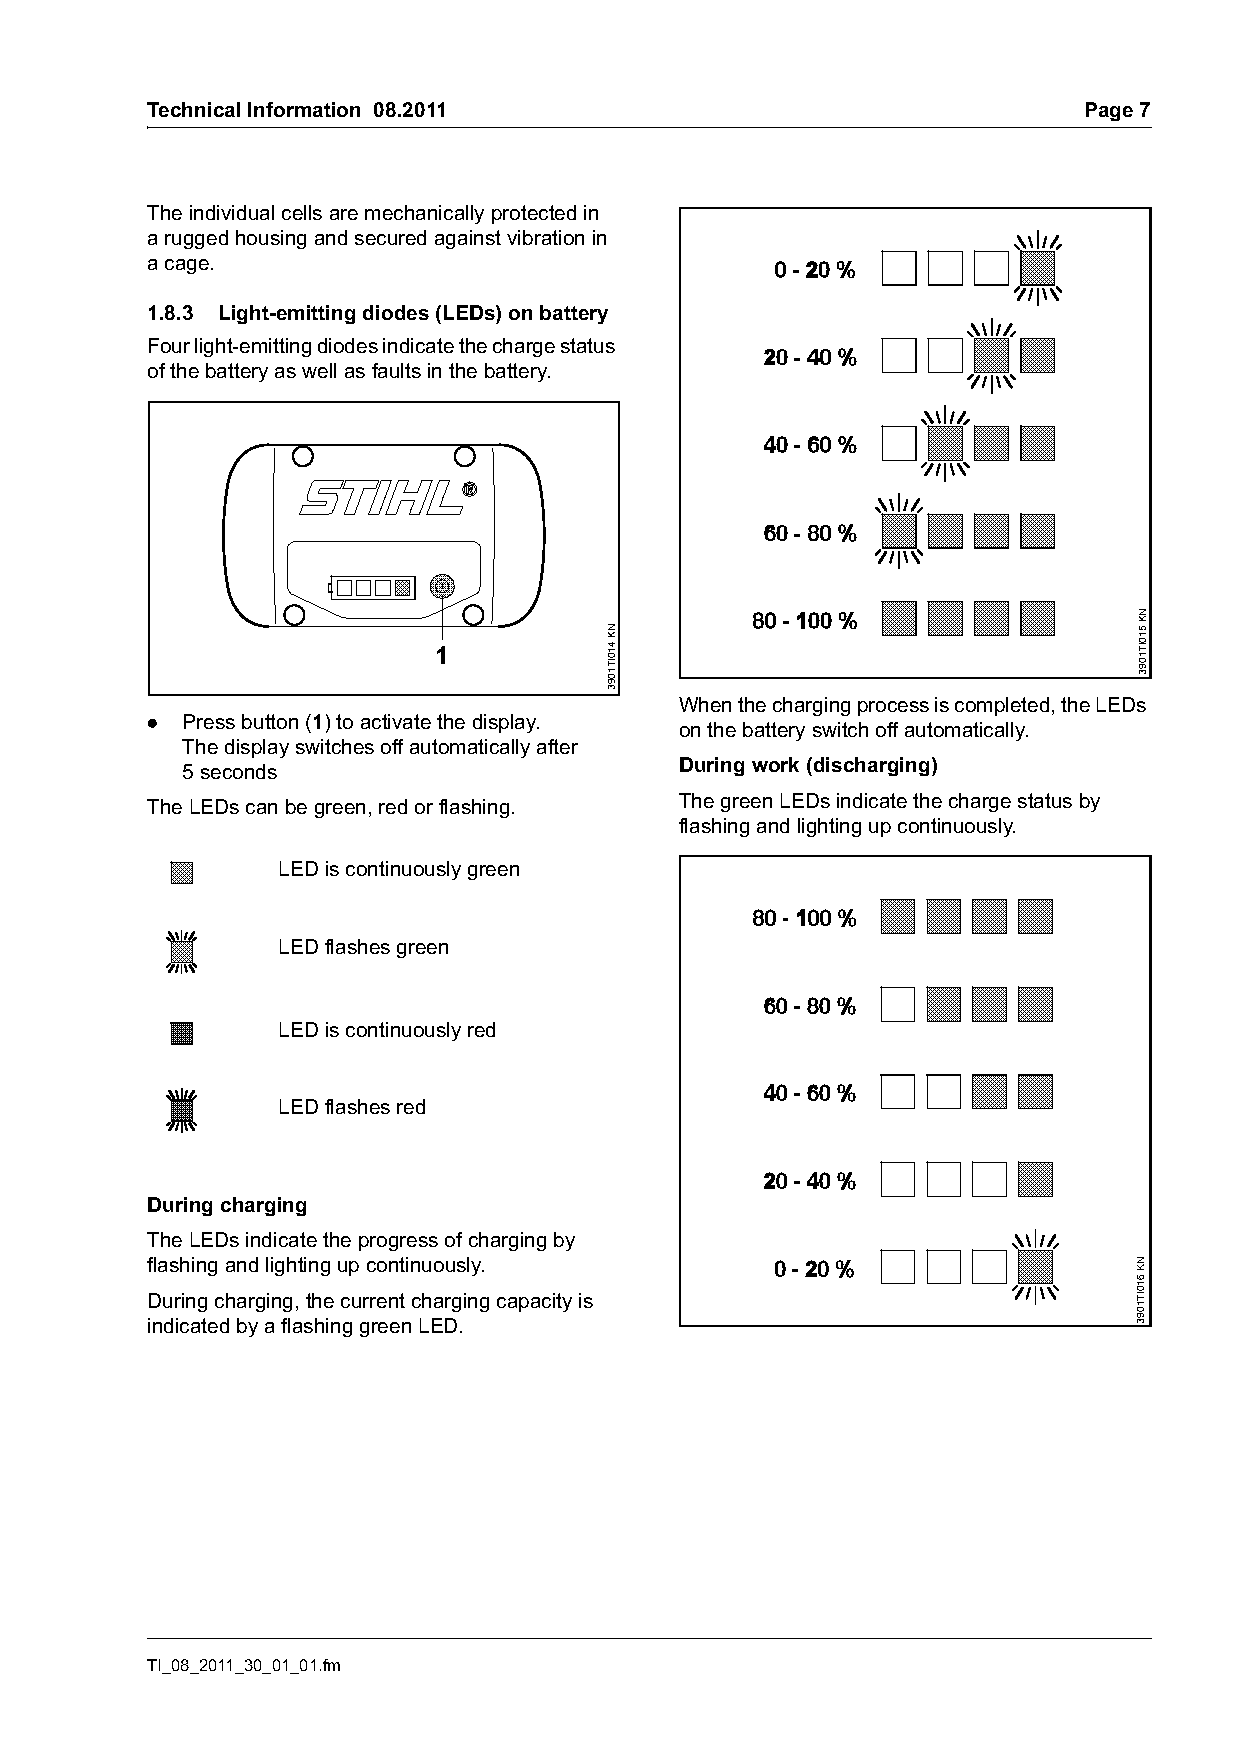
Four light-emitting diodes indicate the charge status
of the battery as well as faults in the battery.

                                                                                                                   3901TI015 KN
                                                    3901TI014 KN

                                1
                                                                   When the charging process is completed, the LEDs
.   Press button (1) to activate the display.                      on the battery switch off automatically.
    The display switches off automatically after
    5 seconds                                                      During work (discharging)

The LEDs can be green, red or flashing.                            The green LEDs indicate the charge status by
                                                                   flashing and lighting up continuously.

              LED is continuously green

              LED flashes green

              LED is continuously red

              LED flashes red

During charging
The LEDs indicate the progress of charging by
flashing and lighting up continuously.
                                                                                                                  3901TI016 KN

During charging, the current charging capacity is
indicated by a flashing green LED.

TI_08_2011_30_01_01.fm
Page 8 of 21
Text of page 8 — search, copy, screen readers
Page 8                                                                                      Technical Information 08.2011

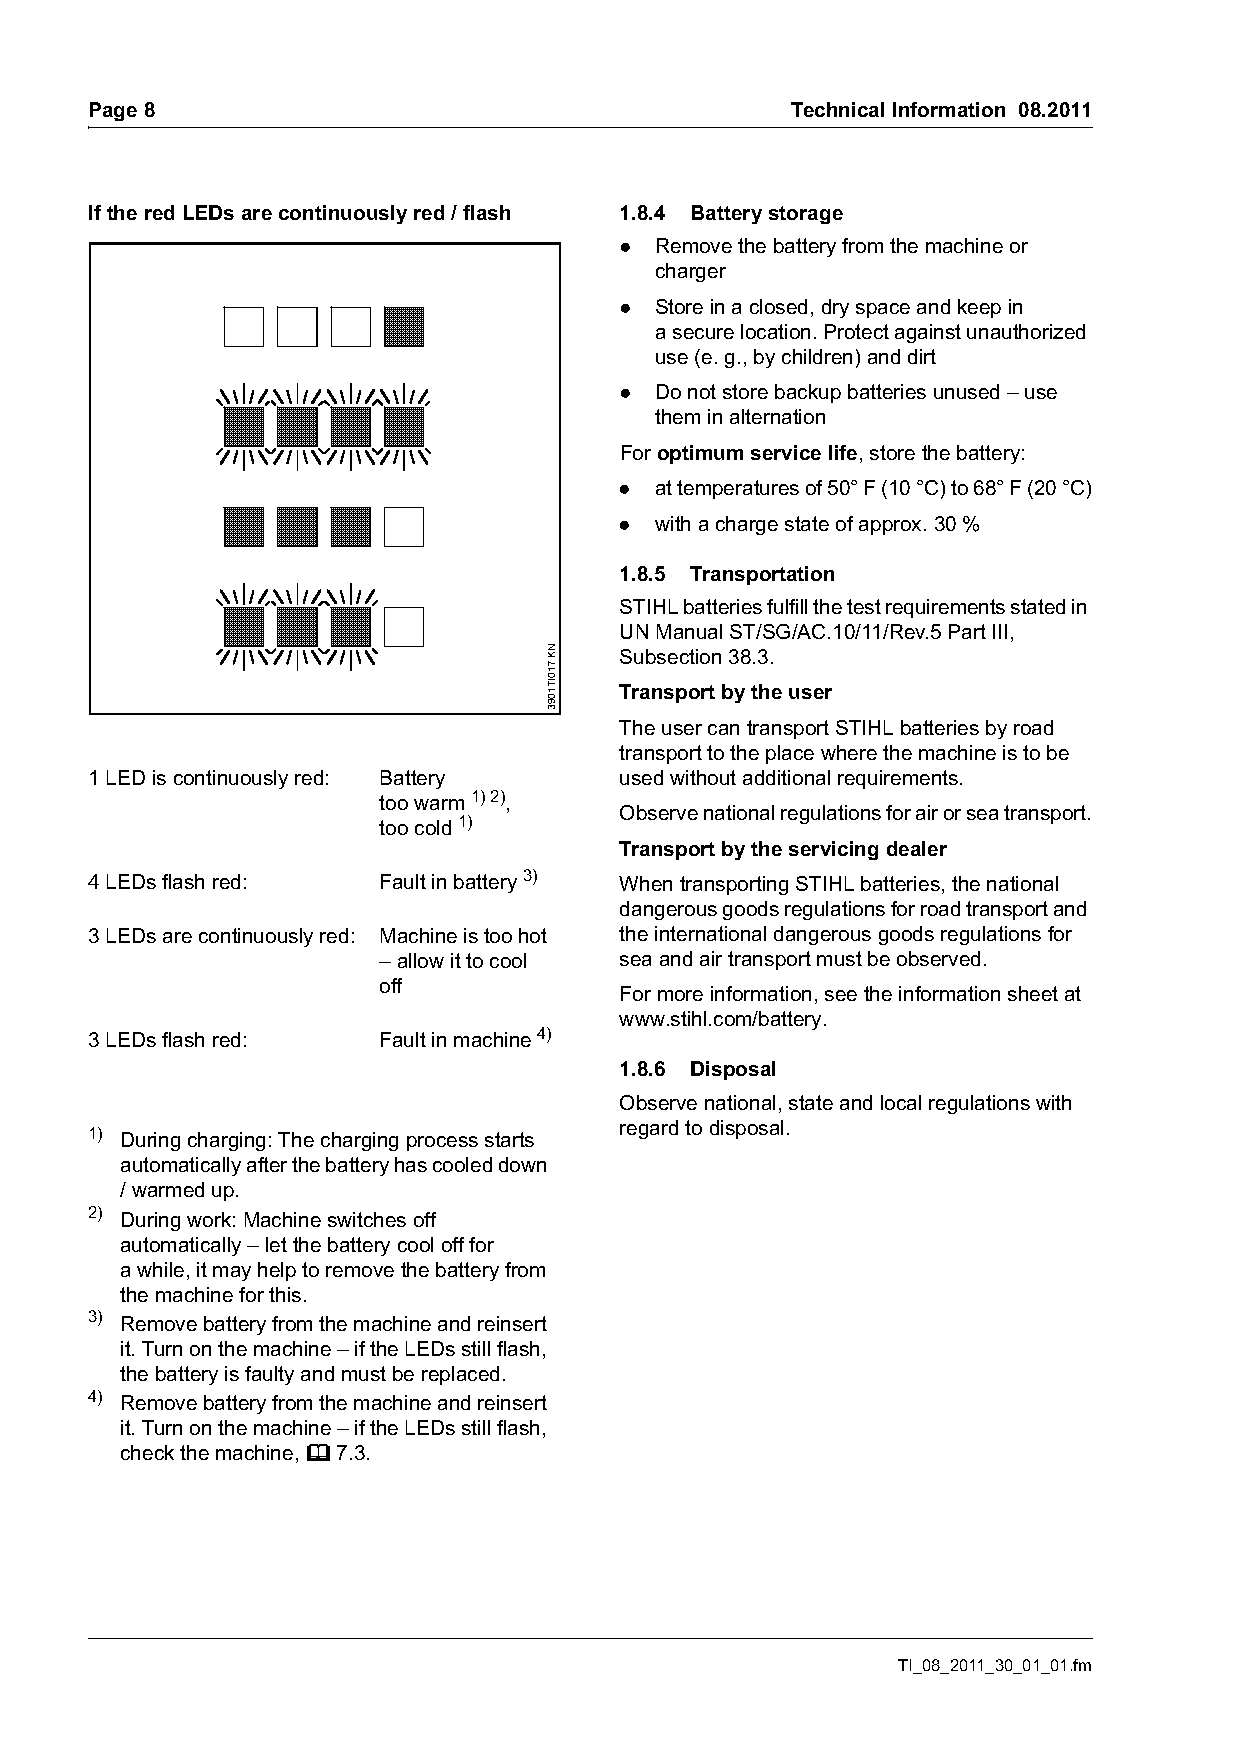
If the red LEDs are continuously red / flash                            1.8.4   Battery storage
                                                                        .   Remove the battery from the machine or
                                                                            charger
                                                                        .   Store in a closed, dry space and keep in
                                                                            a secure location. Protect against unauthorized
                                                                            use (e. g., by children) and dirt
                                                                        .   Do not store backup batteries unused – use
                                                                            them in alternation
                                                                        For optimum service life, store the battery:
                                                                        .   at temperatures of 50° F (10 °C) to 68° F (20 °C)
                                                                        .   with a charge state of approx. 30 %

                                                                        1.8.5   Transportation
                                                                        STIHL batteries fulfill the test requirements stated in
                                                                        UN Manual ST/SG/AC.10/11/Rev.5 Part III,
                                                         3901TI017 KN

                                                                        Subsection 38.3.
                                                                        Transport by the user
                                                                        The user can transport STIHL batteries by road
                                                                        transport to the place where the machine is to be
1 LED is continuously red:       Battery                                used without additional requirements.
                                 too warm 1) 2),                        Observe national regulations for air or sea transport.
                                 too cold 1)
                                                                        Transport by the servicing dealer
                                                    3)
4 LEDs flash red:                Fault in battery                       When transporting STIHL batteries, the national
                                                                        dangerous goods regulations for road transport and
3 LEDs are continuously red:     Machine is too hot                     the international dangerous goods regulations for
                                 – allow it to cool                     sea and air transport must be observed.
                                 off                                    For more information, see the information sheet at
                                                                        www.stihl.com/battery.
3 LEDs flash red:                Fault in machine 4)
                                                                        1.8.6   Disposal
                                                                        Observe national, state and local regulations with
1)                                                                      regard to disposal.
   During charging: The charging process starts
   automatically after the battery has cooled down
   / warmed up.
2) During work: Machine switches off
   automatically – let the battery cool off for
   a while, it may help to remove the battery from
   the machine for this.
3)
   Remove battery from the machine and reinsert
   it. Turn on the machine – if the LEDs still flash,
   the battery is faulty and must be replaced.
4)
   Remove battery from the machine and reinsert
   it. Turn on the machine – if the LEDs still flash,
   check the machine, b 7.3.

                                                                                                        TI_08_2011_30_01_01.fm
Page 9 of 21
Text of page 9 — search, copy, screen readers
Technical Information 08.2011                                                                          Page 9

1.8.7   Battery Recycling                               1.9       Charger
Battery recycling information:


                                                                                                             3901TI081 KN
                                                                                         #

                                                        –     Light-emitting diode (LED) (1)
STIHL is committed to the development of products       –     Power cord with power plug (not shown in
that are environmentally responsible. This                    illustration)
commitment does not stop when the product leaves        –     Rating plate (#)
the STIHL dealer. STIHL has partnered with the
RBRC (Rechargeable Battery Recycling
Corporation) to promote the collection and recycling    STIHL offers two chargers.
of spent STIHL lithium ion batteries in the United
States and Canada. The RBRC seal can be found           –     AL 300 charger
on every STIHL rechargeable battery and indicates             with high charging current and air cooling
that STIHL has prepaid for recycling the battery. The         (with fan) for short charging times
seal has a toll free phone number (1-800-822-8837)      –     AL 100 charger
under which information on battery recycling                  with low charging current and without air cooling
locations and information on battery disposal bans            (without fan)
or restrictions is offered.
                                                        Charging principle
                                                        The charger charges the battery in two stages. First
                                                        the battery is charged with a constant current up to
                                                        a preset voltage limit. Then the charger switches to
                                                        charging with a constant voltage. The charging
                                                        current is then reduced until the minimum charging
                                                        current is exceeded or the preset total charging time
                                                        is exceeded. Then the charger switches off
                                                        automatically.

TI_08_2011_30_01_01.fm
Page 10 of 21
Text of page 10 — search, copy, screen readers
Page 10                                                                                 Technical Information 08.2011

1.9.1   Charging a battery                                           The battery warms up in the machine during use.
When delivered, the battery is charged to a charge                   If a battery that is too warm is inserted in the
state of approx. 30 %.                                               charger, it may be necessary for the battery to cool
The battery must be charged before being used for                    off before charging. The charging process does not
the first time.                                                      start until the battery has cooled off. The charging
                                                                     time can be extended by the cooling off period.
                                                                     The battery and the charger warm up during the
                                                                     charging process.
                                                                     The AL 300 charger is equipped with a fan for
                                                                     cooling the battery. The fan can be heard during
                                                                     charging.
                                      2                              The AL 100 charger waits with the charging
                                                                     procedure until the battery has cooled off on its own.
                                                                     The battery is cooled by the natural flow of air.
                                                                     Once the battery is completely charged, the charger
                                                      3901TI019 KN

                                                                     switches off automatically, then:
                                                                     –   the LEDs on the battery go out
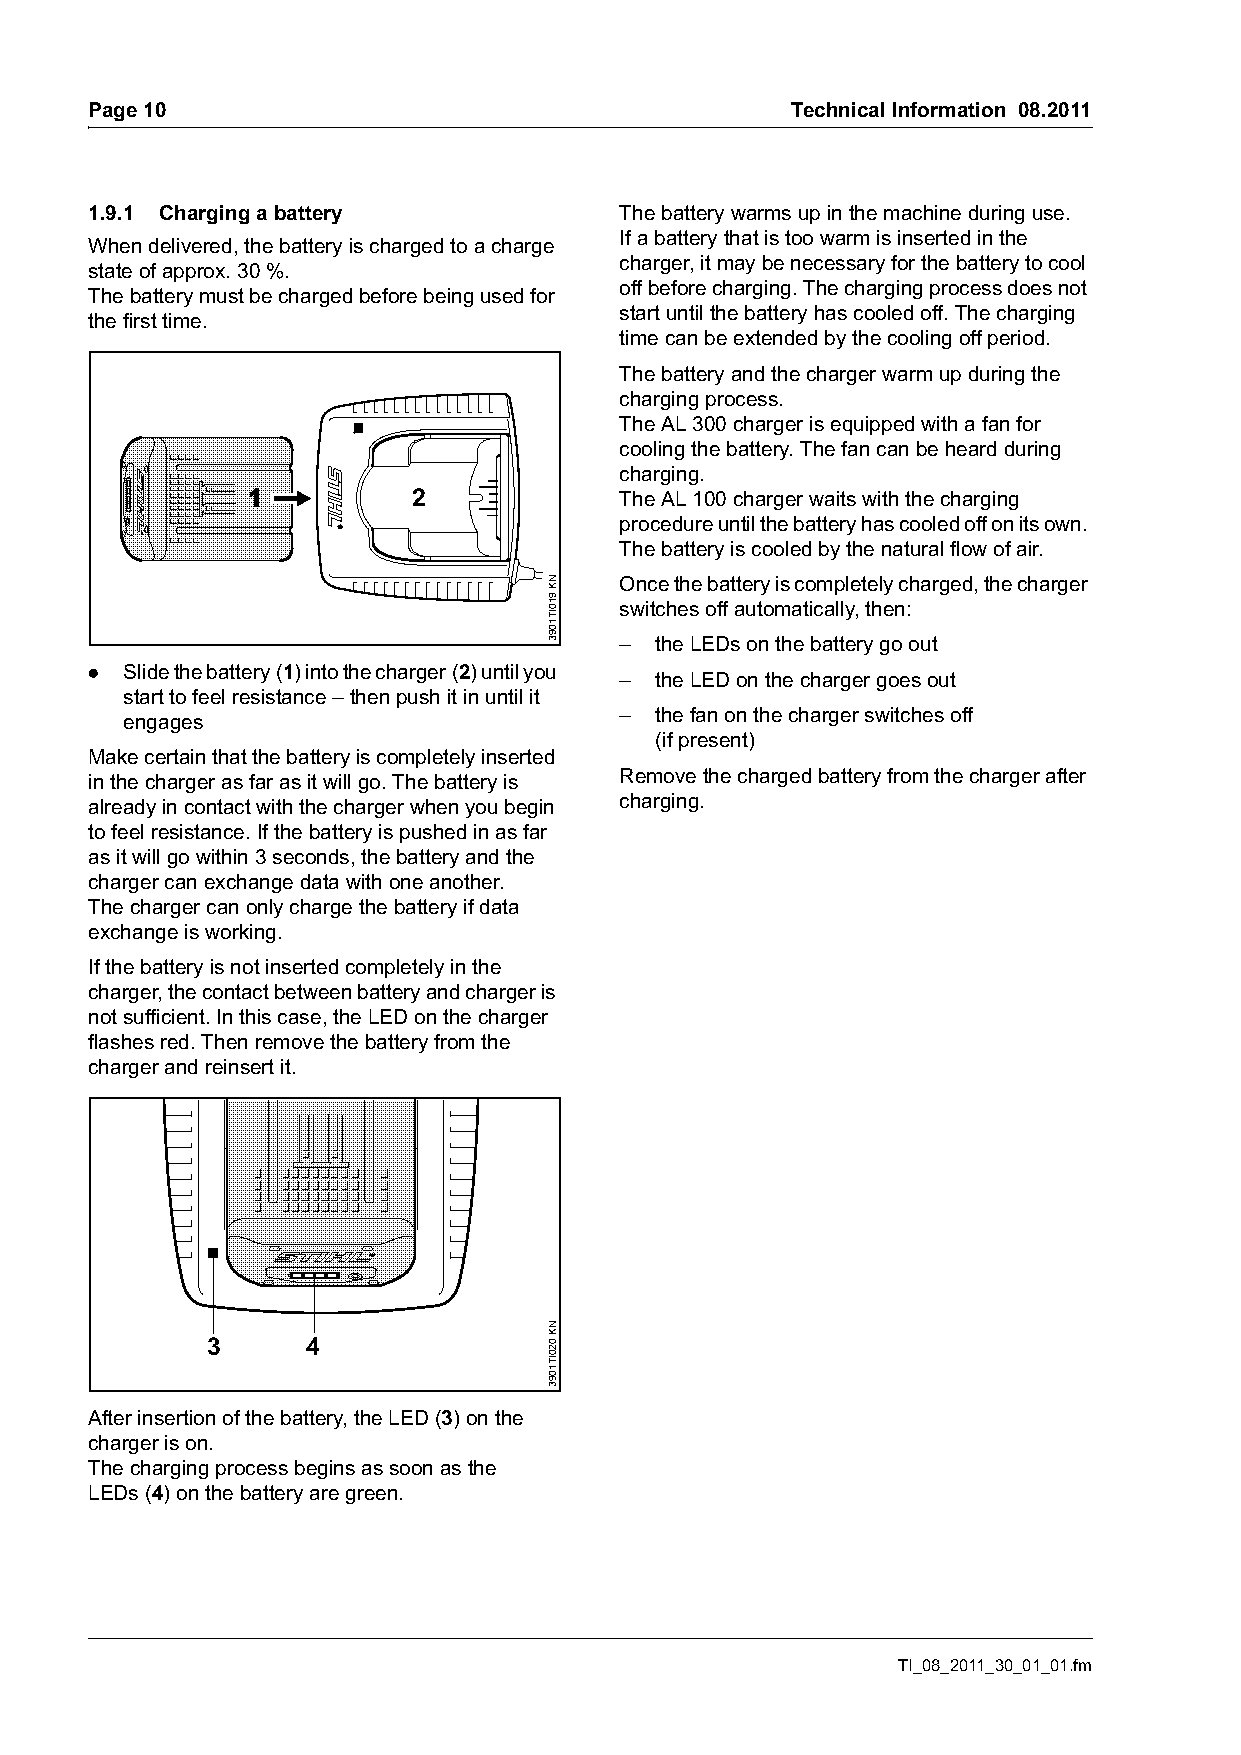
.   Slide the battery (1) into the charger (2) until you             –   the LED on the charger goes out
    start to feel resistance – then push it in until it
    engages                                                          –   the fan on the charger switches off
                                                                         (if present)
Make certain that the battery is completely inserted
in the charger as far as it will go. The battery is                  Remove the charged battery from the charger after
already in contact with the charger when you begin                   charging.
to feel resistance. If the battery is pushed in as far
as it will go within 3 seconds, the battery and the
charger can exchange data with one another.
The charger can only charge the battery if data
exchange is working.
If the battery is not inserted completely in the
charger, the contact between battery and charger is
not sufficient. In this case, the LED on the charger
flashes red. Then remove the battery from the
charger and reinsert it.
                                                      3901TI020 KN

             3           4

After insertion of the battery, the LED (3) on the
charger is on.
The charging process begins as soon as the
LEDs (4) on the battery are green.

                                                                                                     TI_08_2011_30_01_01.fm
Page 11 of 21
Text of page 11 — search, copy, screen readers
Technical Information 08.2011                                                                                  Page 11

1.9.2   Light-emitting diode (LED) on charger                      2.      Safety instructions
                                                                                For transport and before all repair and
                                                                                maintenance work, always switch off
                                                                                the machine, set the hand guard to ƒ
                                                                                and remove the battery from the
                                                                                machine. This prevents inadvertent
                                                                                starting of the motor.

                                                                   2.1     Battery

                                                    3901TI021 KN
              1                                                         Warning!
                                                                            Risk of fire, explosion and/or burns,
                                                                            including chemical burns. Do not
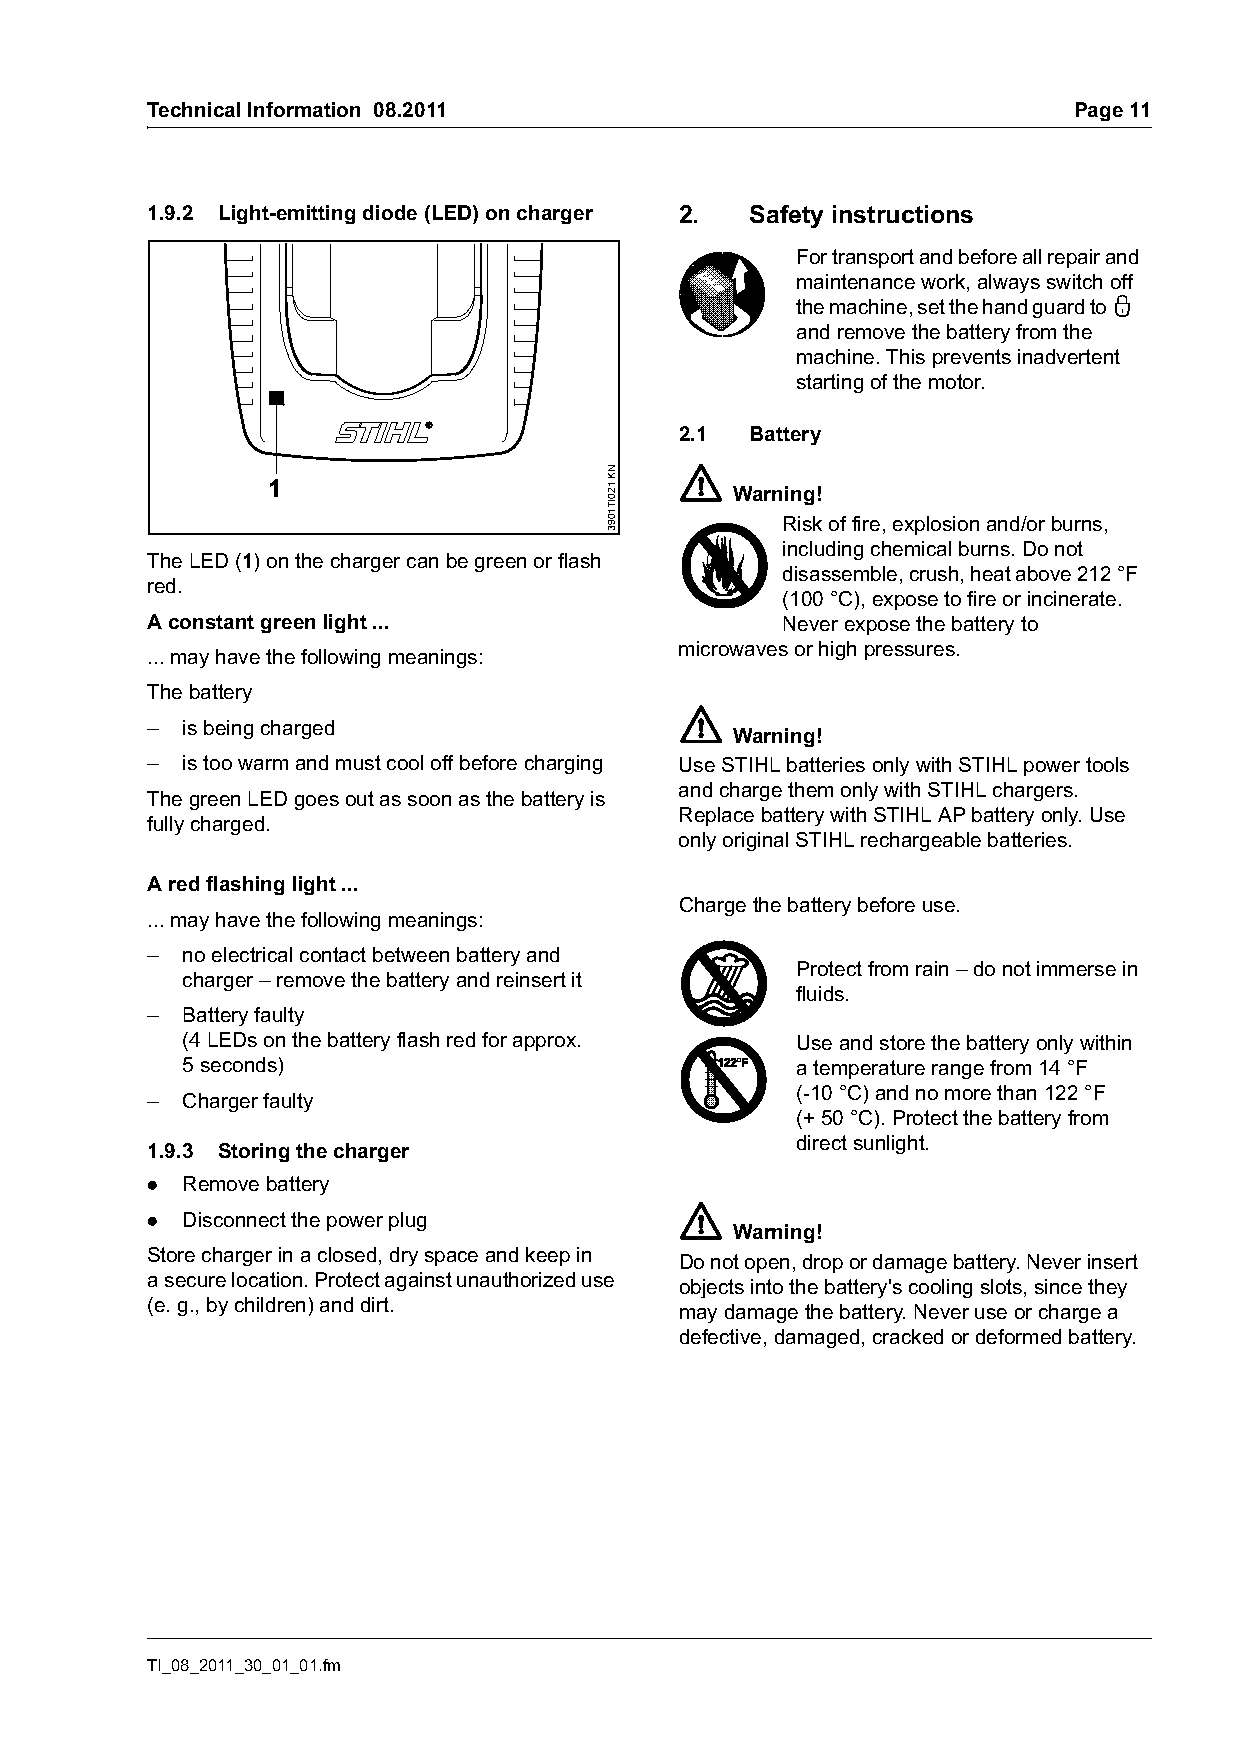
The LED (1) on the charger can be green or flash
                                                                            disassemble, crush, heat above 212 °F
red.
                                                                            (100 °C), expose to fire or incinerate.
A constant green light ...                                                  Never expose the battery to
... may have the following meanings:                               microwaves or high pressures.

The battery
–   is being charged                                                     Warning!
–   is too warm and must cool off before charging                  Use STIHL batteries only with STIHL power tools
The green LED goes out as soon as the battery is                   and charge them only with STIHL chargers.
fully charged.                                                     Replace battery with STIHL AP battery only. Use
                                                                   only original STIHL rechargeable batteries.

A red flashing light ...
                                                                   Charge the battery before use.
... may have the following meanings:
–   no electrical contact between battery and
                                                                                Protect from rain – do not immerse in
    charger – remove the battery and reinsert it
                                                                                fluids.
–   Battery faulty
    (4 LEDs on the battery flash red for approx.                                Use and store the battery only within
    5 seconds)                                                                  a temperature range from 14 °F
–   Charger faulty                                                              (-10 °C) and no more than 122 °F
                                                                                (+ 50 °C). Protect the battery from
1.9.3   Storing the charger                                                     direct sunlight.
.   Remove battery
.   Disconnect the power plug
                                                                         Warning!
Store charger in a closed, dry space and keep in                   Do not open, drop or damage battery. Never insert
a secure location. Protect against unauthorized use                objects into the battery's cooling slots, since they
(e. g., by children) and dirt.                                     may damage the battery. Never use or charge a
                                                                   defective, damaged, cracked or deformed battery.

TI_08_2011_30_01_01.fm
Page 12 of 21
Text of page 12 — search, copy, screen readers
Page 12                                                                      Technical Information 08.2011

                                                                      Use and store charger only indoors in
       Warning!                                                       dry rooms.
Fluid may leak from the battery if it is damaged or
is not used properly – avoid contact with the skin!
Leaking battery fluid may cause skin irritation and      .   Operate charger at temperatures between 41 °F
chemical burns. In the event of accidental contact,          (5 °C) and 104 °F (40 °C).
immediately rinse thoroughly with mild soap and          .   Allow the charger to cool down normally – do not
water. If fluid gets into your eye(s), do not rub your       cover it.
eye(s) and rinse water over the open eye(s) for
15 minutes at least. Also seek medical attention         .   Never bridge the contacts of the charger with
immediately.                                                 metallic objects (e.g. nails, coins, jewelry) –
                                                             short circuit. The charger may be damaged by
                                                             a short circuit.
       Warning!                                          .   In the event of smoke or fire in the charger,
Never bridge (short circuit) the battery terminals           disconnect it from outlet immediately.
with metallic objects, since this may damage the
battery and possibly cause a fire. Keep a battery
that is not in use away from metal objects (e.g.                Warning!
nails, coins, jewelry). Do not use metal containers      To reduce the risk of electric shock or short circuit,
for transporting batteries.                              do not insert any objects in the charger's cooling
                                                         slots.
Store the battery out of reach of children in a cool
and dry area away from direct sunlight and excess
heat or cold (14 °F – 122 °F (-10 °C – +50 °C)).                Warning!
                                                         The charger heats up during the charging process.
2.2      Charger                                         Do not operate on an easily combustible surface
.     Use only original STIHL chargers.                  (e.g. paper, textiles) or in an easily combustible
                                                         environment – risk of fire.
.     Use only for charging matching STIHL type AP
      batteries with a maximum capacity of 10 Ah and
      a maximum voltage of 42 V.
                                                               Warning!
.     Never charge defective, leaking or deformed        Do not operate in a hazardous location, i.e. in
      batteries.                                         a location where there are combustible liquids
.     Connect the charger only to a power supply with    (fumes), vapors or dusts. Chargers can produce
      the voltage and frequency specified on the         sparks, which may ignite the dust or vapors – risk
      rating plate. Always connect the charger to        of explosion.
      a properly installed wall outlet.
.     Never use a charger with damaged housing,                       Check the charger's power supply
      damaged power supply cord or damaged plug.                      cord and plug regularly for damage.
      Do not operate the charger if it has received                   If the power supply cord or plug is
      a sharp blow, been dropped or otherwise                         damaged, immediately disconnect the
      damaged in any way.                                             plug from the wall outlet to avoid the
                                                                      risk of electric shock.
.     Do not open or disassemble charger – no user
      serviceable parts inside.
                                                         .   Never jerk the power supply cord to disconnect
.     Store charger out of the reach of children.            it from the wall outlet. To unplug, grasp the plug,
                                                             not the cord. Have a damaged power supply
               Protect charger from rain and                 cord repaired by an experienced electrician.
               dampness. Keep charger dry.               .   Do not use the power supply cord for any other
                                                             purpose, e.g. for carrying or hanging up the
                                                             charger.

                                                                                         TI_08_2011_30_01_01.fm
Page 13 of 21
Text of page 13 — search, copy, screen readers
Technical Information 08.2011                          Page 13

.   Never use power supply cords that do not
    comply with regulations.
.   Make sure the power supply cord is located
    and/or marked so that it will not be stepped on,
    tripped over, come in contact with sharp edges
    or moving parts or otherwise be subjected to
    damage or stress.
.   An extension cord should not be used unless
    absolutely necessary. If an extension cord must
    be used, plug the charger into a properly wired
    16 gauge (AWG 16) or heavier gauge extension
    cord with blades that are the same number, size
    and shapes as the blades on the charger.
To reduce the risk of electric shock:
.   Always connect the unit to a properly installed
    wall outlet.
.   Make sure the insulation of the power supply
    cord and plug is in good condition.
Unplug the power supply cord from the outlet when
charger is not in use.
Never store the battery in the charger.

More safety precautions – see instruction manual.

TI_08_2011_30_01_01.fm
Page 14 of 21
Text of page 14 — search, copy, screen readers
Page 14                                                                      Technical Information 08.2011

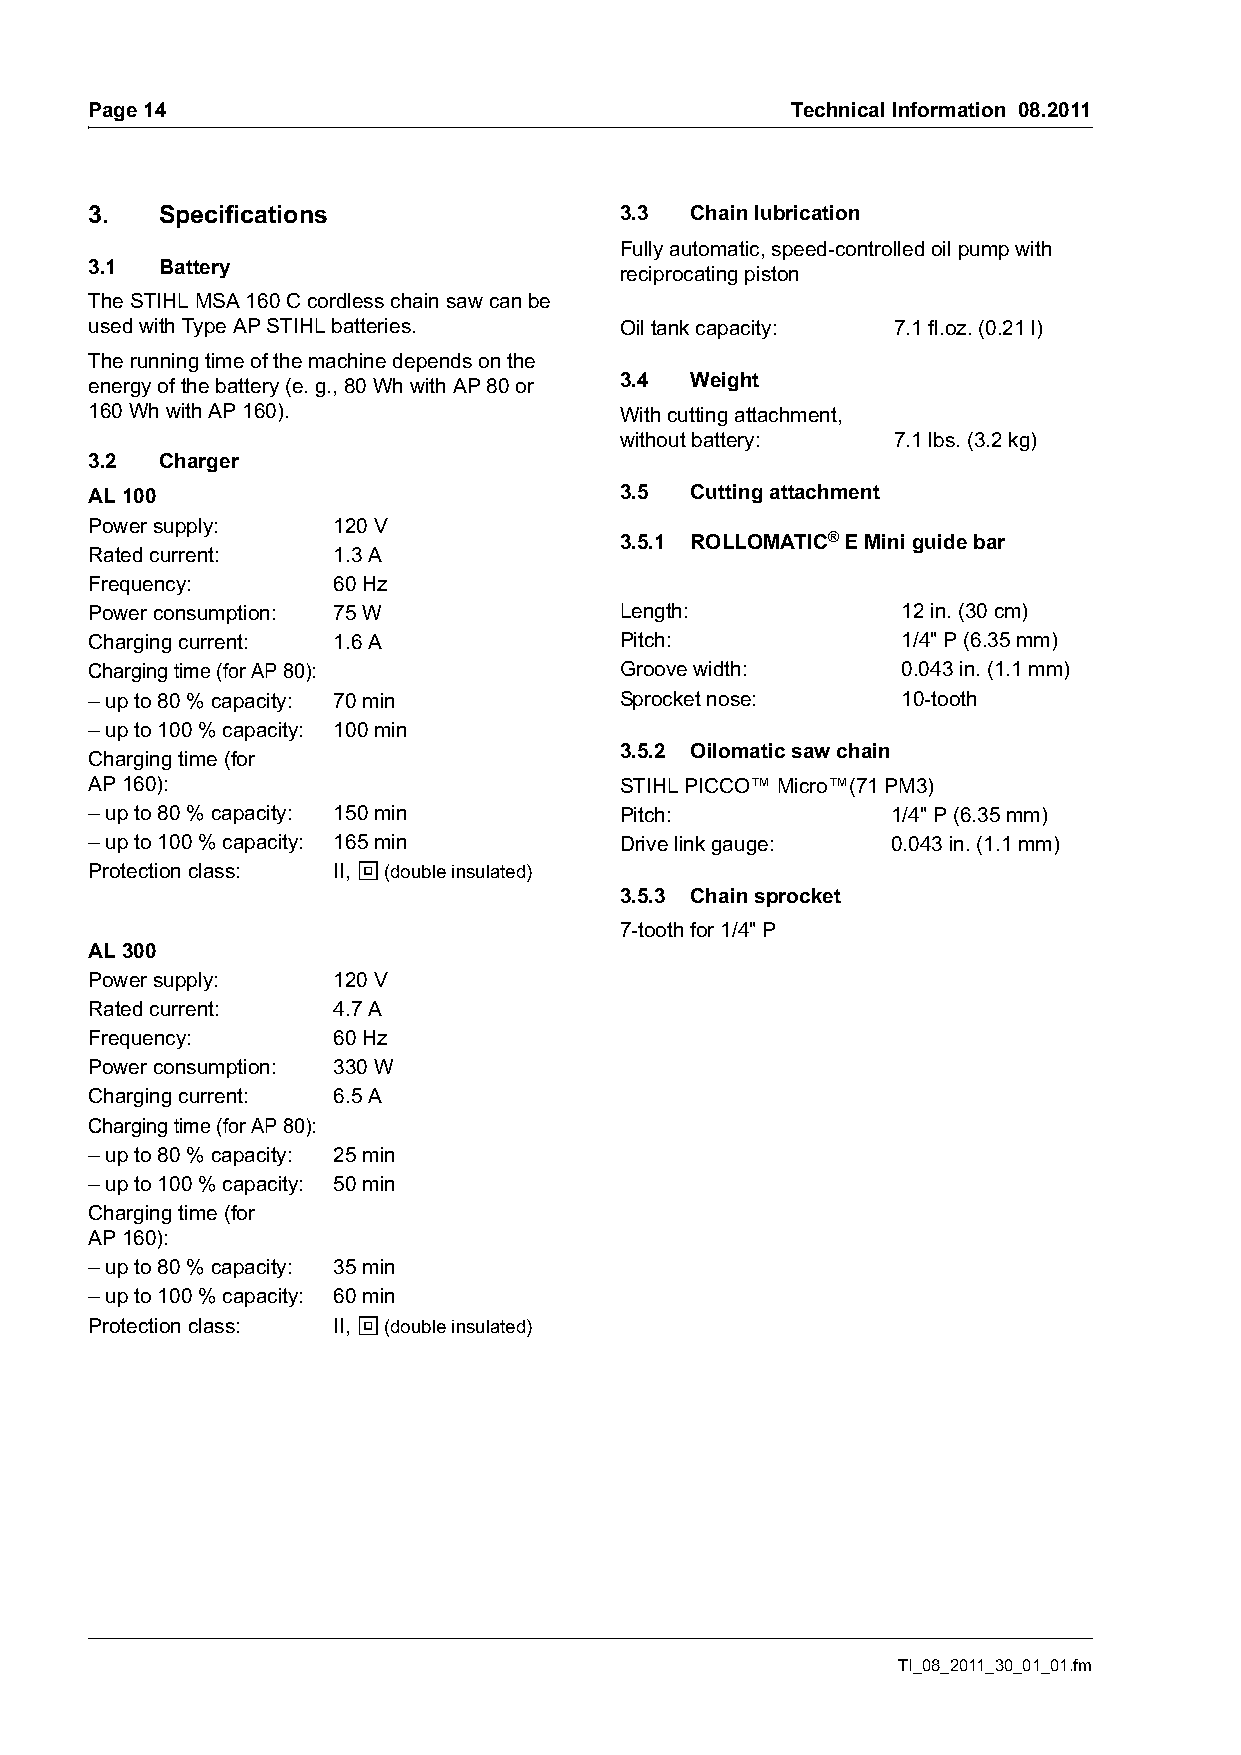
3.      Specifications                                  3.3     Chain lubrication
                                                        Fully automatic, speed-controlled oil pump with
3.1     Battery                                         reciprocating piston
The STIHL MSA 160 C cordless chain saw can be
used with Type AP STIHL batteries.                      Oil tank capacity:            7.1 fl.oz. (0.21 l)
The running time of the machine depends on the
energy of the battery (e. g., 80 Wh with AP 80 or       3.4     Weight
160 Wh with AP 160).                                    With cutting attachment,
                                                        without battery:              7.1 lbs. (3.2 kg)
3.2     Charger
AL 100                                                  3.5     Cutting attachment
Power supply:                120 V
                                                        3.5.1   ROLLOMATIC® E Mini guide bar
Rated current:               1.3 A
Frequency:                   60 Hz
Power consumption:           75 W                       Length:                        12 in. (30 cm)
Charging current:            1.6 A                      Pitch:                         1/4" P (6.35 mm)
Charging time (for AP 80):                              Groove width:                  0.043 in. (1.1 mm)
– up to 80 % capacity:       70 min                     Sprocket nose:                 10-tooth
– up to 100 % capacity:      100 min
Charging time (for                                      3.5.2   Oilomatic saw chain
AP 160):                                                STIHL PICCO™ Micro™(71 PM3)
– up to 80 % capacity:       150 min                    Pitch:                 1/4" P (6.35 mm)
– up to 100 % capacity:      165 min                    Drive link gauge:      0.043 in. (1.1 mm)
Protection class:            II, E (double insulated)
                                                        3.5.3   Chain sprocket
                                                        7-tooth for 1/4" P
AL 300
Power supply:                120 V
Rated current:               4.7 A
Frequency:                   60 Hz
Power consumption:           330 W
Charging current:            6.5 A
Charging time (for AP 80):
– up to 80 % capacity:       25 min
– up to 100 % capacity:      50 min
Charging time (for
AP 160):
– up to 80 % capacity:       35 min
– up to 100 % capacity:      60 min
Protection class:            II, E (double insulated)

                                                                                       TI_08_2011_30_01_01.fm
Page 15 of 21
Text of page 15 — search, copy, screen readers
Technical Information 08.2011                                                         Page 15

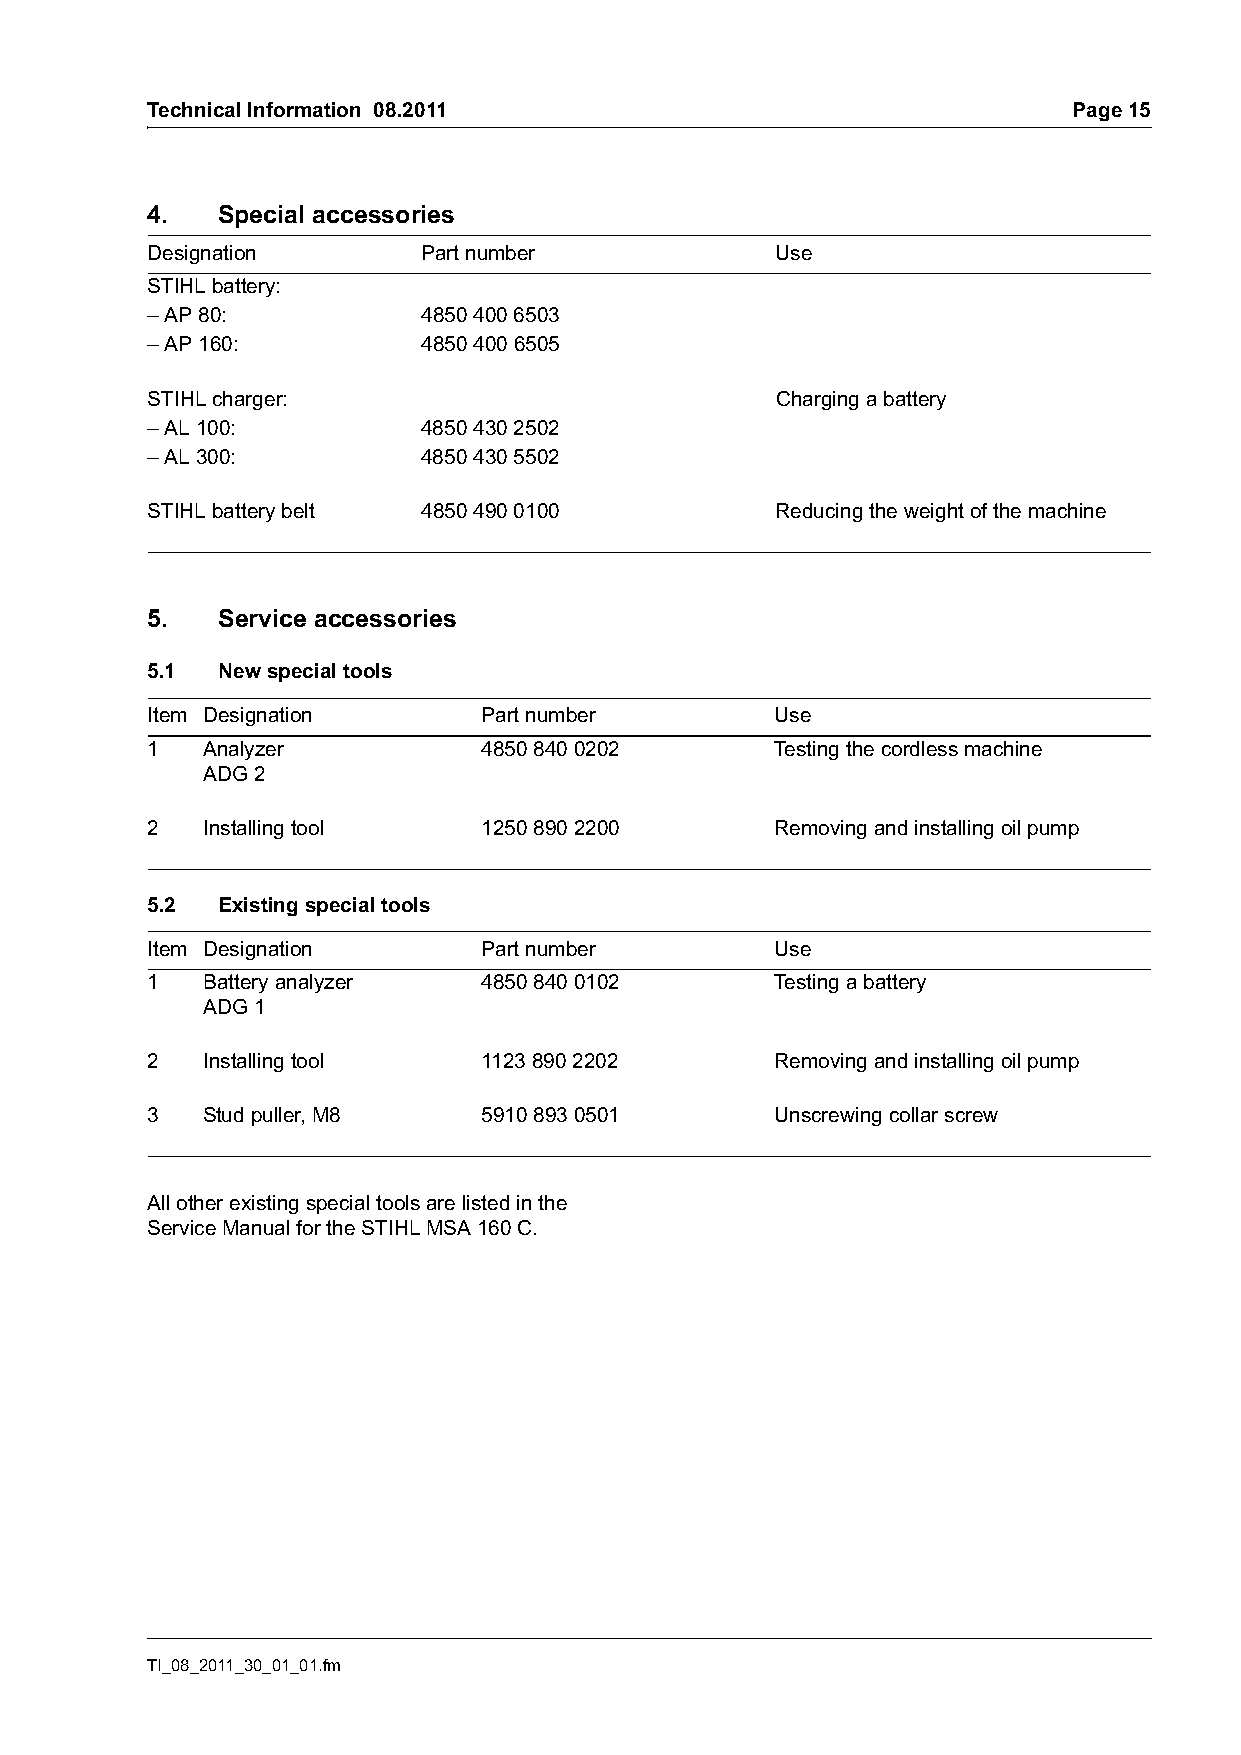
4.      Special accessories
Designation                     Part number            Use
STIHL battery:
– AP 80:                        4850 400 6503
– AP 160:                       4850 400 6505

STIHL charger:                                         Charging a battery
– AL 100:                       4850 430 2502
– AL 300:                       4850 430 5502

STIHL battery belt              4850 490 0100          Reducing the weight of the machine

5.      Service accessories

5.1     New special tools

Item Designation                       Part number     Use
1     Analyzer                         4850 840 0202   Testing the cordless machine
      ADG 2

2     Installing tool                  1250 890 2200   Removing and installing oil pump

5.2     Existing special tools

Item Designation                       Part number     Use
1     Battery analyzer                 4850 840 0102   Testing a battery
      ADG 1

2     Installing tool                  1123 890 2202   Removing and installing oil pump

3     Stud puller, M8                  5910 893 0501   Unscrewing collar screw

All other existing special tools are listed in the
Service Manual for the STIHL MSA 160 C.

TI_08_2011_30_01_01.fm
Page 16 of 21
Text of page 16 — search, copy, screen readers
Page 16                                                                              Technical Information 08.2011

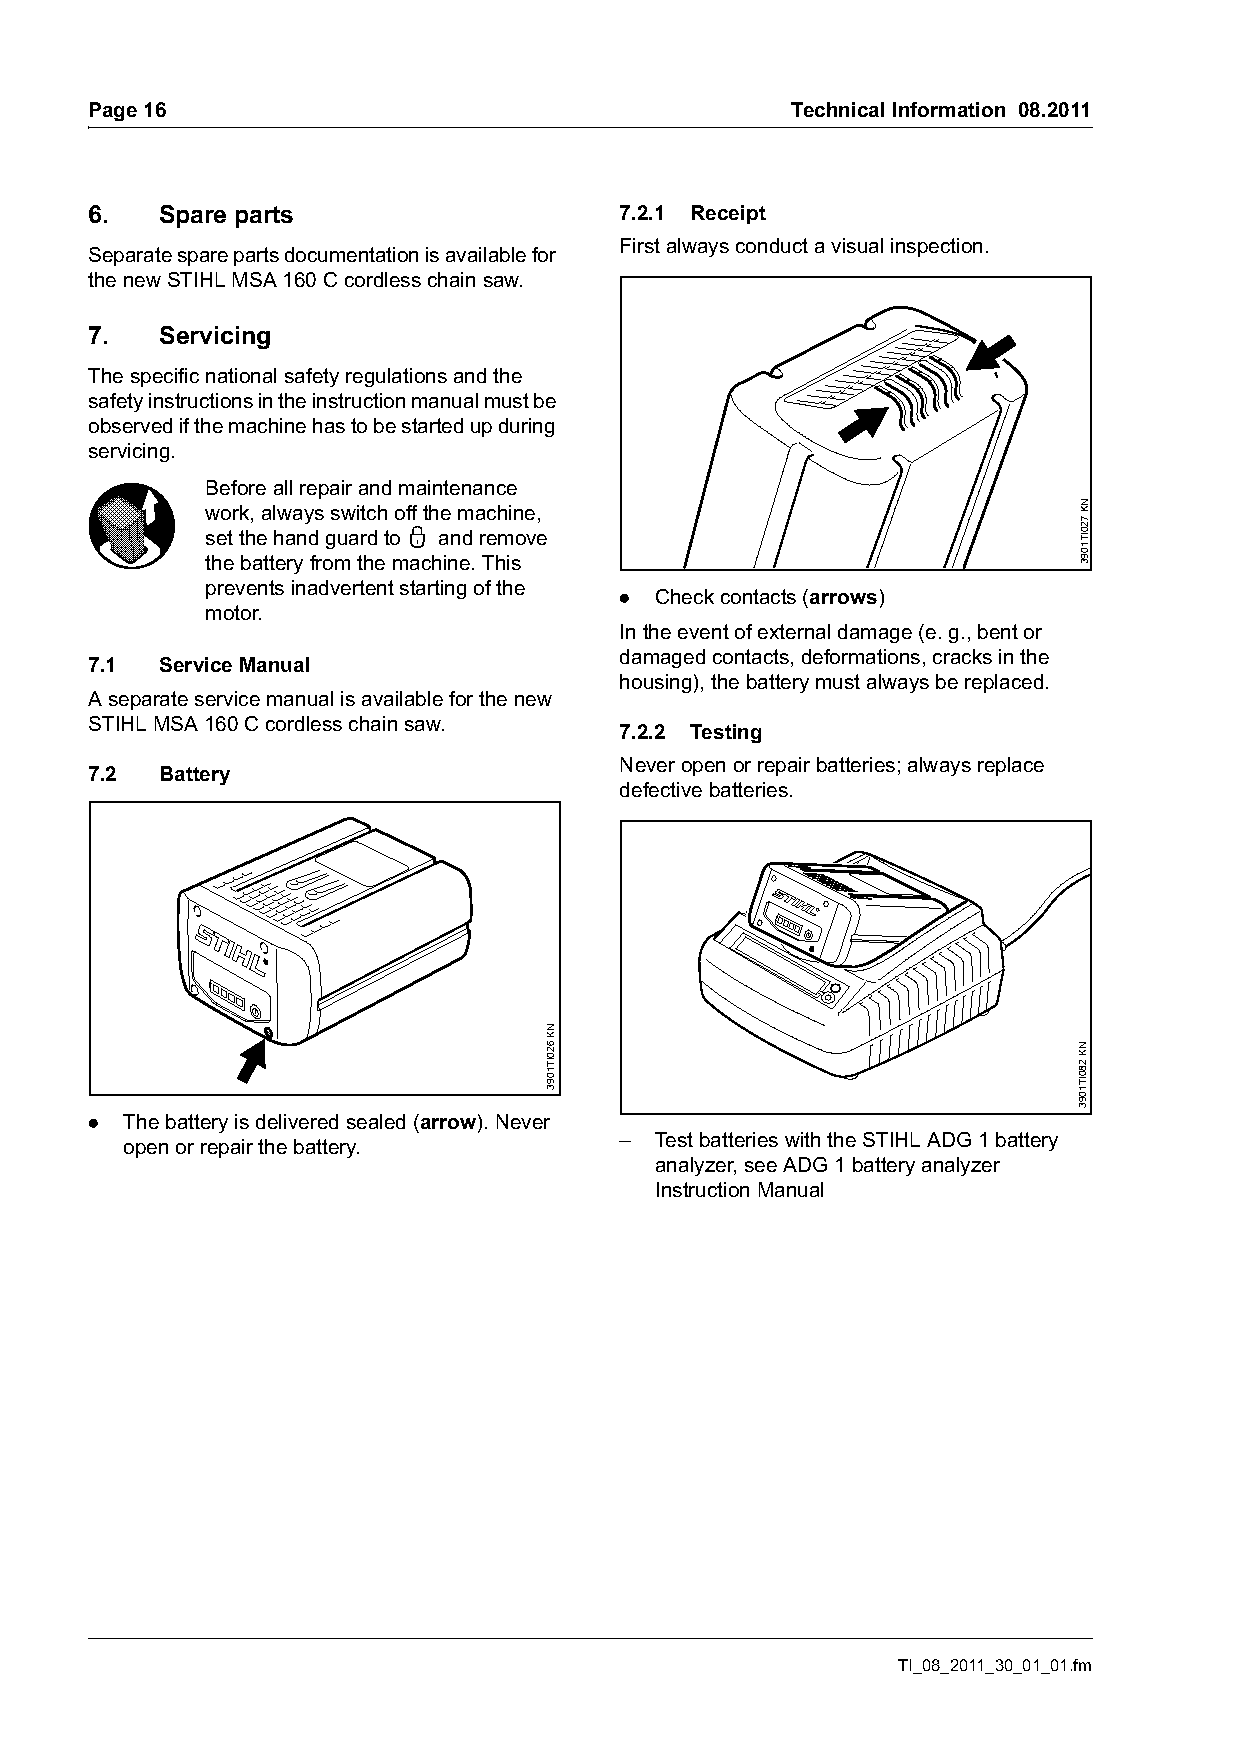
6.       Spare parts                                              7.2.1   Receipt

Separate spare parts documentation is available for               First always conduct a visual inspection.
the new STIHL MSA 160 C cordless chain saw.

7.       Servicing
The specific national safety regulations and the
safety instructions in the instruction manual must be
observed if the machine has to be started up during
servicing.
              Before all repair and maintenance

                                                                                                                     3901TI027 KN
              work, always switch off the machine,
              set the hand guard to ƒ and remove
              the battery from the machine. This
              prevents inadvertent starting of the                .   Check contacts (arrows)
              motor.
                                                                  In the event of external damage (e. g., bent or
7.1      Service Manual                                           damaged contacts, deformations, cracks in the
                                                                  housing), the battery must always be replaced.
A separate service manual is available for the new
STIHL MSA 160 C cordless chain saw.                               7.2.2   Testing

7.2      Battery                                                  Never open or repair batteries; always replace
                                                                  defective batteries.
                                                   3901TI026 KN

                                                                                                                    3901TI082 KN

.     The battery is delivered sealed (arrow). Never
      open or repair the battery.                                 –   Test batteries with the STIHL ADG 1 battery
                                                                      analyzer, see ADG 1 battery analyzer
                                                                      Instruction Manual

                                                                                                TI_08_2011_30_01_01.fm
Page 17 of 21
Text of page 17 — search, copy, screen readers
Technical Information 08.2011                                                                               Page 17

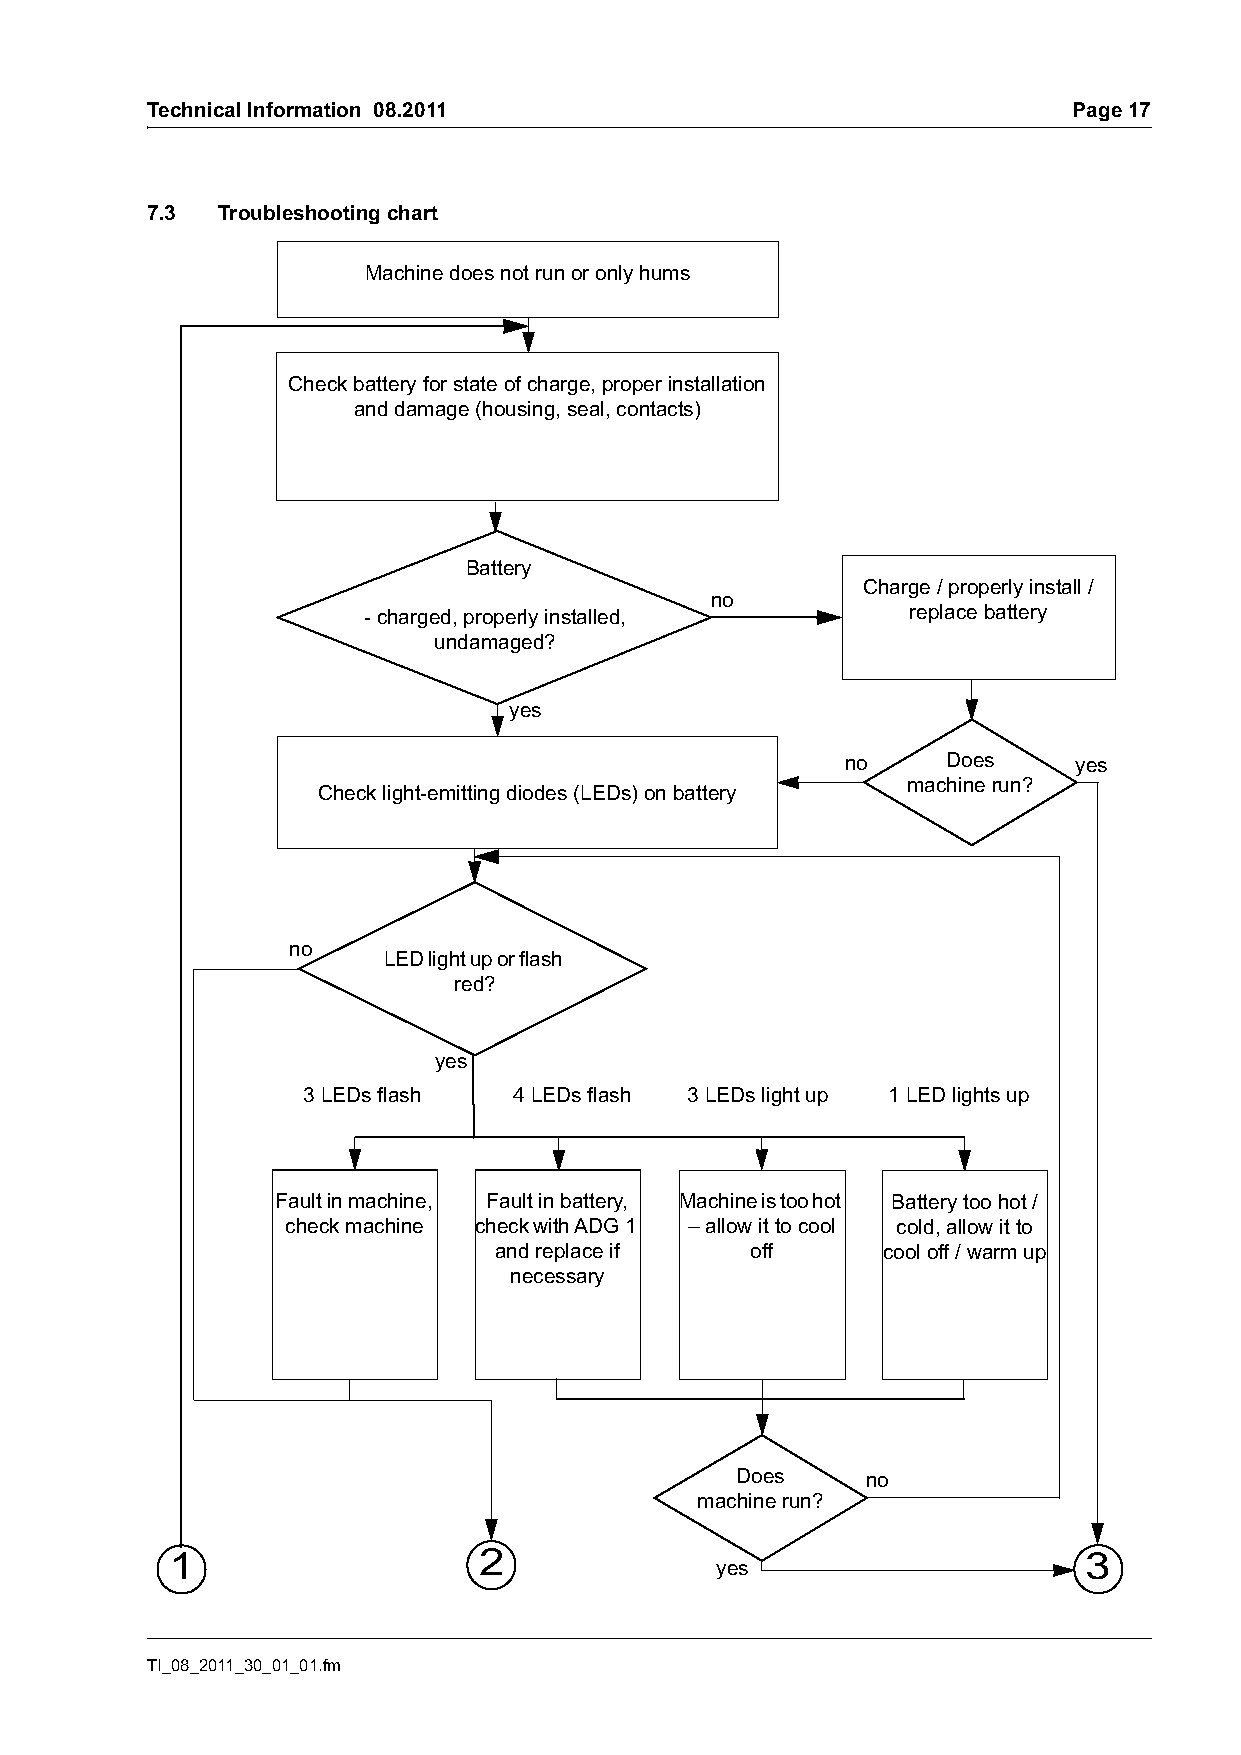
7.3     Troubleshooting chart

                          Machine does not run or only hums

                Check battery for state of charge, proper installation
                      and damage (housing, seal, contacts)

                                     Battery
                                                                                   Charge / properly install /
                         - charged, properly installed,                                replace battery
                                 undamaged?

                                            yes

                                                                                  no        Does            yes
                     Check light-emitting diodes (LEDs) on battery                       machine run?

                no          LED light up or flash
                                   red?

                                  yes
                 3 LEDs flash               4 LEDs flash     3 LEDs light up           1 LED lights up

              Fault in machine,          Fault in battery,   Machine is too hot         Battery too hot /
               check machine            check with ADG 1     – allow it to cool         cold, allow it to
                                          and replace if            off                cool off / warm up
                                           necessary

                                                                  Does             no
                                                               machine run?

  1                                     2                        yes                                         3

TI_08_2011_30_01_01.fm
Page 18 of 21
Text of page 18 — search, copy, screen readers
Page 18                                                   Technical Information 08.2011

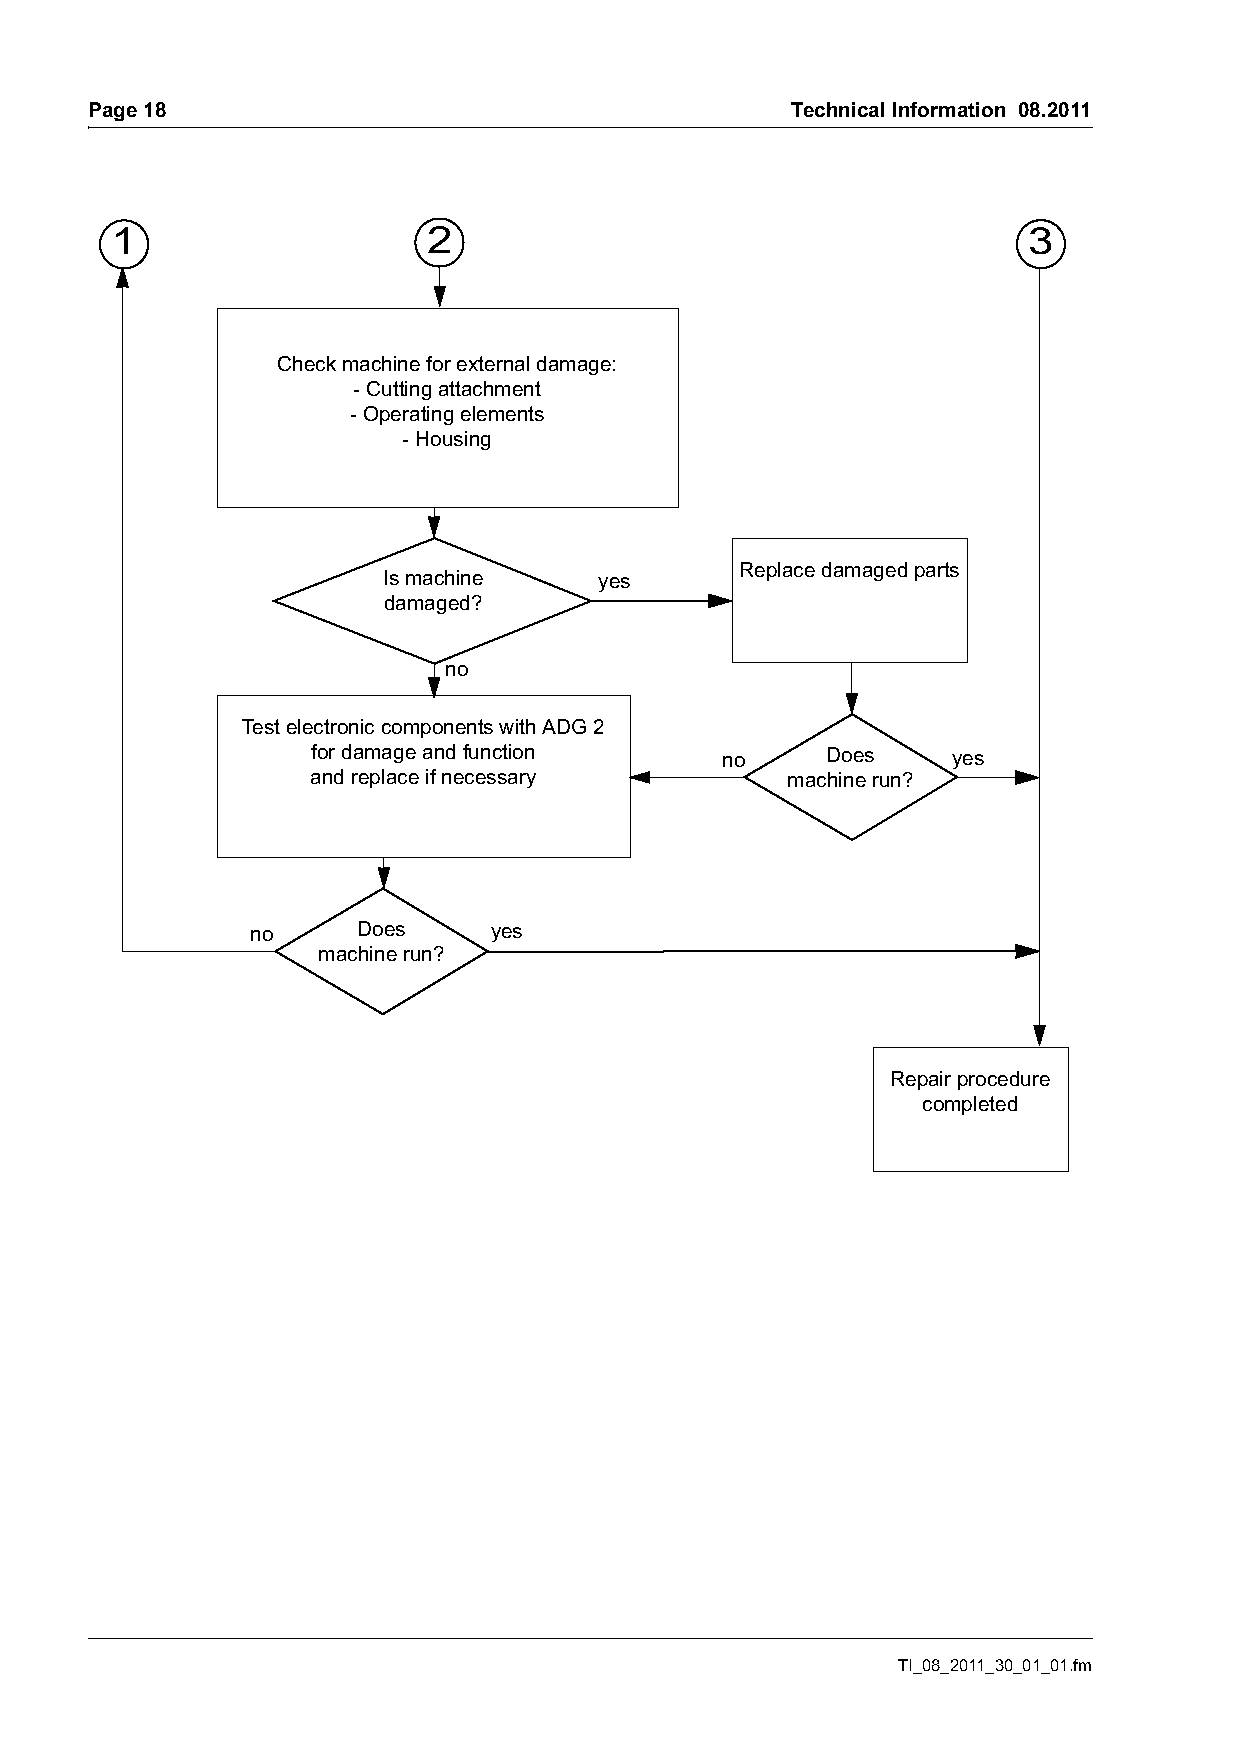
  1                          2                                                     3

               Check machine for external damage:
                      - Cutting attachment
                     - Operating elements
                            - Housing

                         Is machine                   Replace damaged parts
                                               yes
                         damaged?

          Test electronic components with ADG 2
                  for damage and function            no      Does          yes
                  and replace if necessary                machine run?

          no          Does             yes
                   machine run?

                                                                    Repair procedure
                                                                      completed

                                                                     TI_08_2011_30_01_01.fm
Page 19 of 21
Text of page 19 — search, copy, screen readers
Technical Information 08.2011                                                                                        Page 19

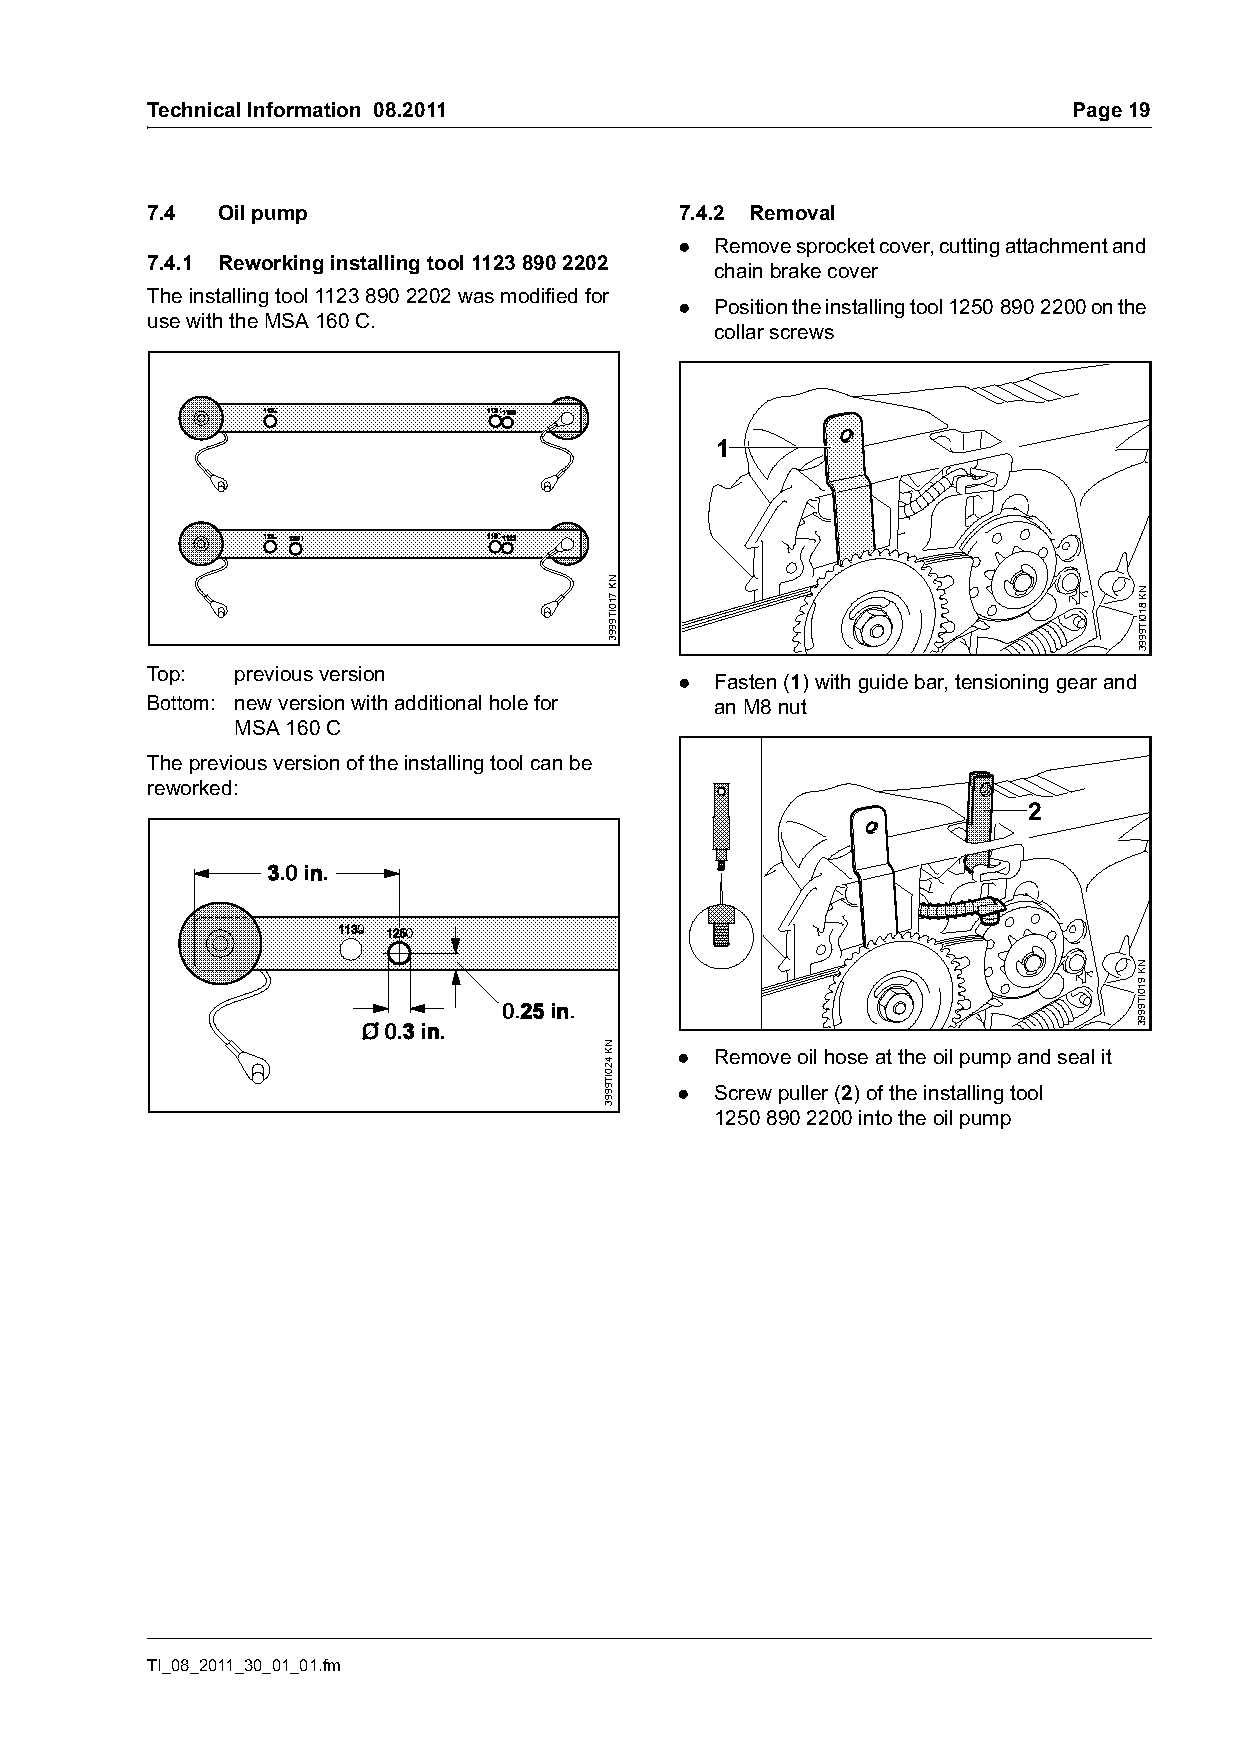
7.4     Oil pump                                                       7.4.2   Removal
                                                                       .   Remove sprocket cover, cutting attachment and
7.4.1   Reworking installing tool 1123 890 2202                            chain brake cover
The installing tool 1123 890 2202 was modified for                     .   Position the installing tool 1250 890 2200 on the
use with the MSA 160 C.                                                    collar screws


                                                        3999TI017 KN

                                                                                                                          3999TI018 KN
Top:    previous version                                               .   Fasten (1) with guide bar, tensioning gear and
Bottom: new version with additional hole for                               an M8 nut
        MSA 160 C
The previous version of the installing tool can be
reworked:
                                                                                                                2

                                                                                                                          3999TI019 KN
                                                     3999TI024 KN

                                                                       .   Remove oil hose at the oil pump and seal it
                                                                       .   Screw puller (2) of the installing tool
                                                                           1250 890 2200 into the oil pump

TI_08_2011_30_01_01.fm
Page 20 of 21
Text of page 20 — search, copy, screen readers
Page 20                                                                               Technical Information 08.2011

                                                                    7.5    Serial number

                                   3
                                   2
        1

                                                     3999TI020 KN

                                                                                                                     3999TI023 KN
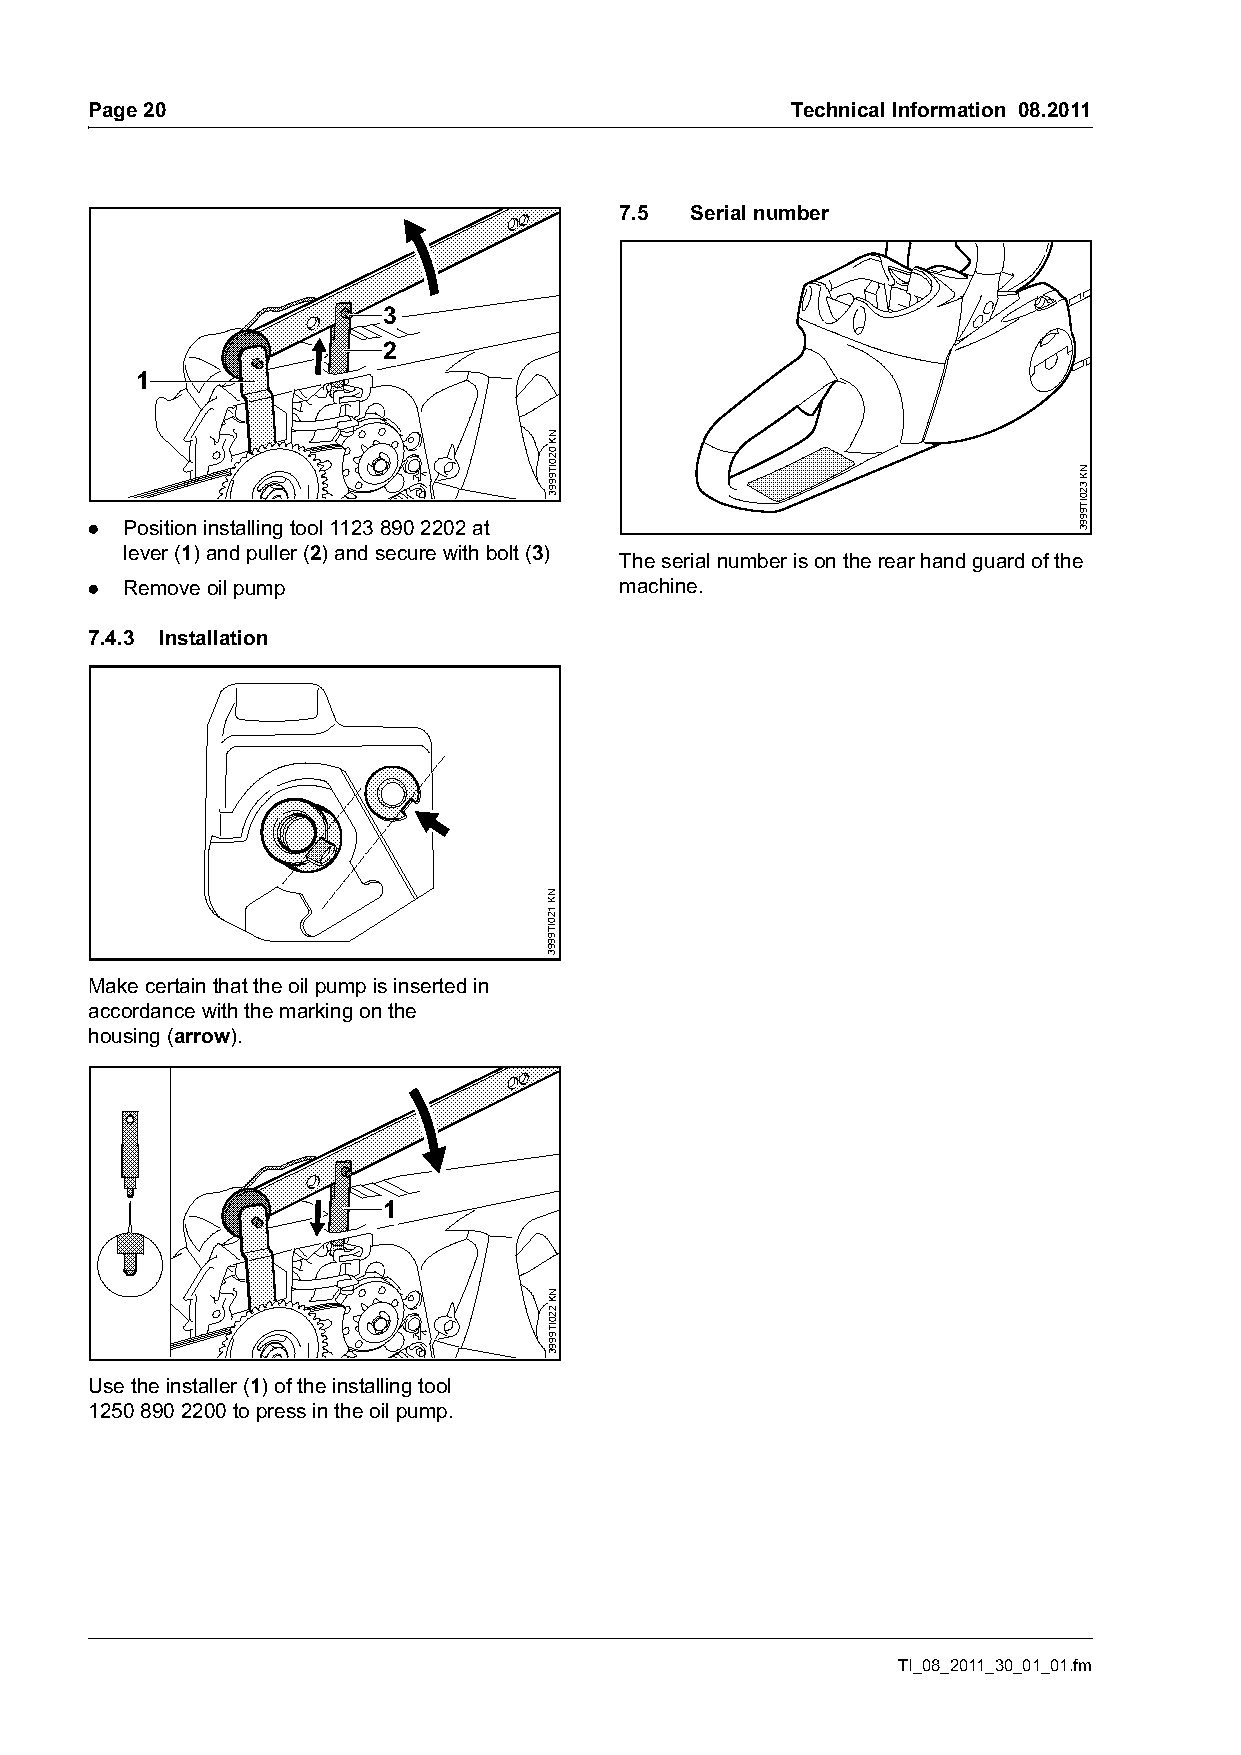
.   Position installing tool 1123 890 2202 at
    lever (1) and puller (2) and secure with bolt (3)               The serial number is on the rear hand guard of the
.   Remove oil pump                                                 machine.

7.4.3       Installation
                                                    3999TI021 KN

Make certain that the oil pump is inserted in
accordance with the marking on the
housing (arrow).

                                   1
                                                     3999TI022 KN

Use the installer (1) of the installing tool
1250 890 2200 to press in the oil pump.

                                                                                                 TI_08_2011_30_01_01.fm
Page 21 of 21
Text of page 21 — search, copy, screen readers
Technical Information 08.2011                                                                   Page 21

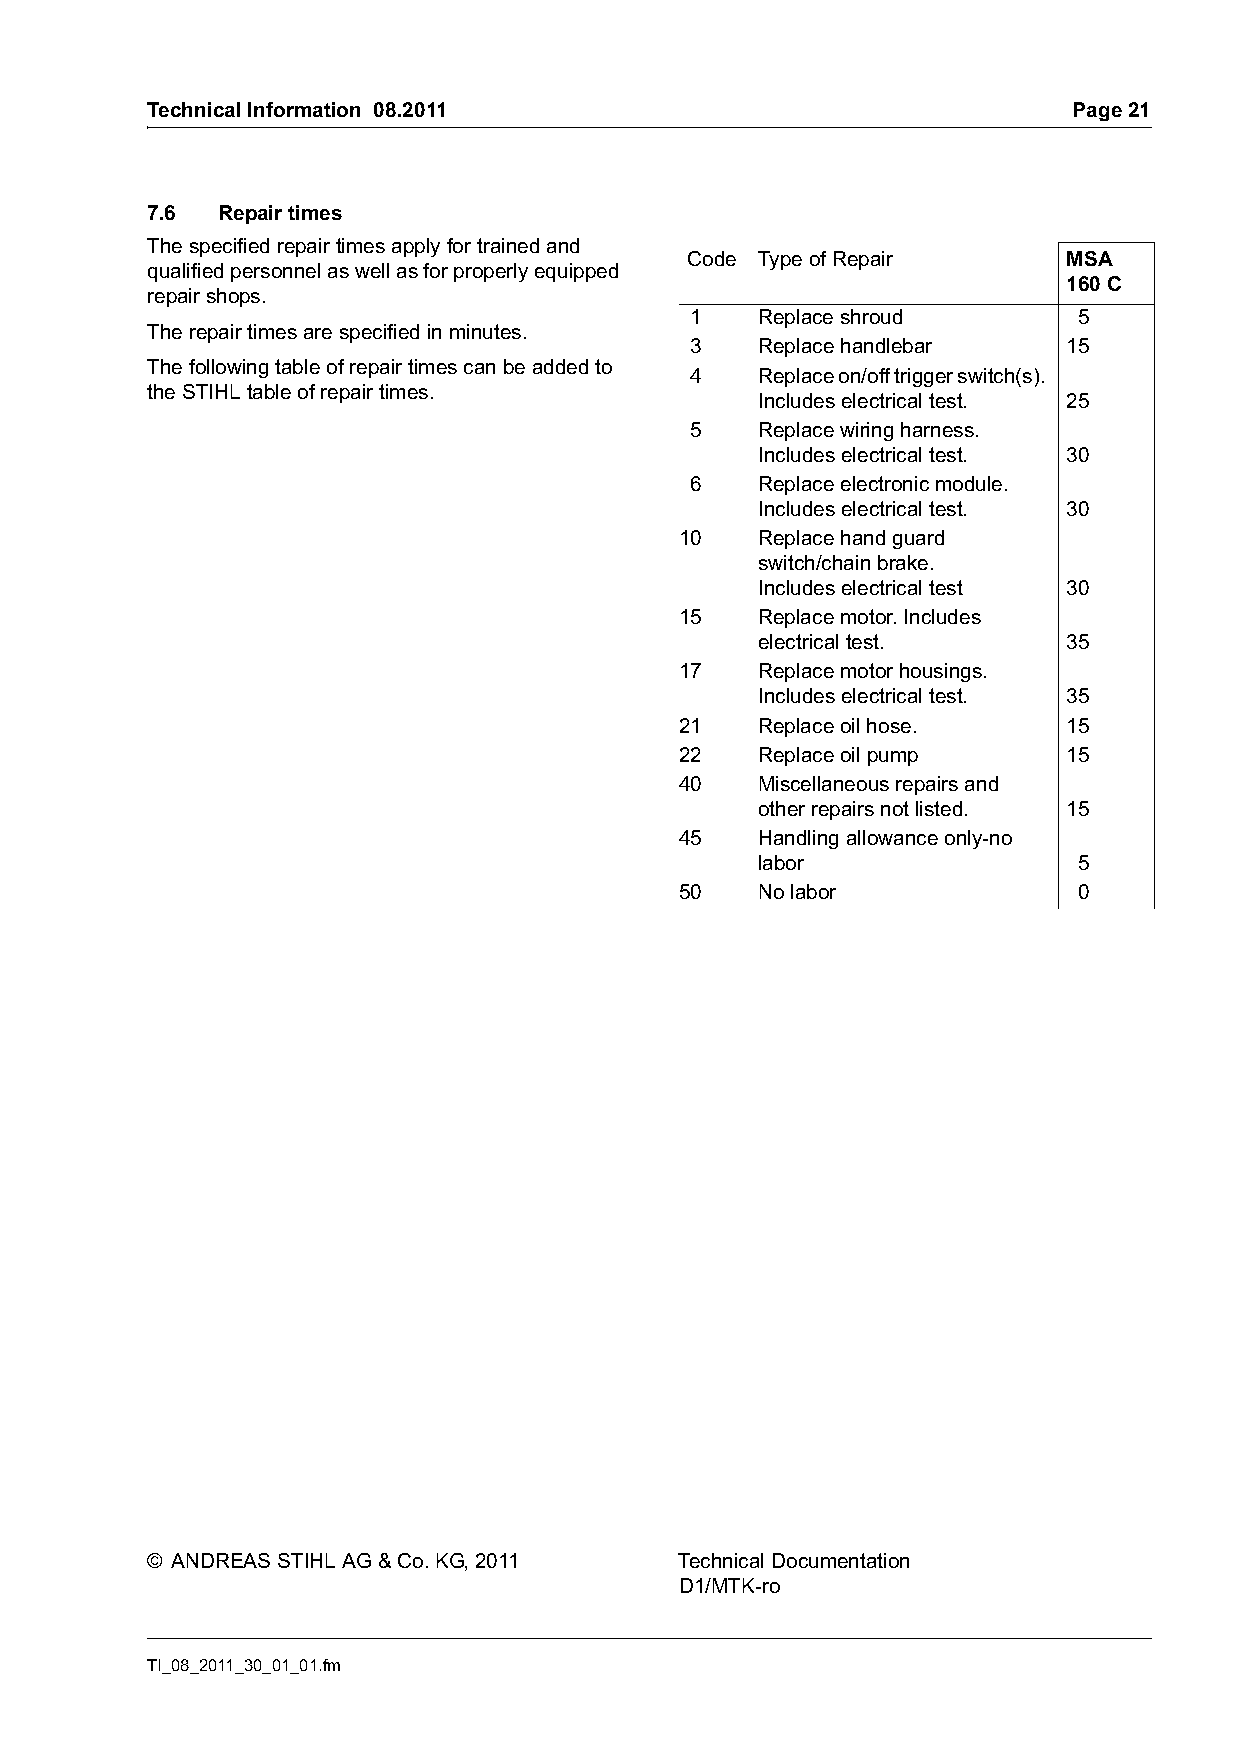
7.6     Repair times
The specified repair times apply for trained and
                                                       Code   Type of Repair                   MSA
qualified personnel as well as for properly equipped
                                                                                               160 C
repair shops.
                                                        1     Replace shroud                     5
The repair times are specified in minutes.
                                                        3     Replace handlebar                 15
The following table of repair times can be added to     4     Replace on/off trigger switch(s).
the STIHL table of repair times.                              Includes electrical test.         25
                                                        5     Replace wiring harness.
                                                              Includes electrical test.         30
                                                        6     Replace electronic module.
                                                              Includes electrical test.         30
                                                       10     Replace hand guard
                                                              switch/chain brake.
                                                              Includes electrical test          30
                                                       15     Replace motor. Includes
                                                              electrical test.                  35
                                                       17     Replace motor housings.
                                                              Includes electrical test.         35
                                                       21     Replace oil hose.                 15
                                                       22     Replace oil pump                  15
                                                       40     Miscellaneous repairs and
                                                              other repairs not listed.         15
                                                       45     Handling allowance only-no
                                                              labor                              5
                                                       50     No labor                           0

© ANDREAS STIHL AG & Co. KG, 2011                      Technical Documentation
                                                       D1/MTK-ro

TI_08_2011_30_01_01.fm
Most of these PDFs embed fonts with a shifted character map, so the text above was recovered rather than copied — read it as a faithful but imperfect transcription, and treat the page image above each block as the authority where the two disagree — the figures exist only there, because they are vector drawings that text extraction cannot keep.